🧠 Intro
Hiya, this website was converted from my steam guide for making maps in the Killing Floor 1 SDK (Unreal Engine 2.5). I HATE KF SDK, I despise it, it’s awful but I’m here because I love KF. If that’s the case for you, you’ll learn to despise KF SDK as well.
Ofc, there is at least a certain charm in this SDK because it’s based on a version of Unreal Editor 2.5 which just breathe’s simplicity.
Sure, the tools may not be intuitive for beginners, but with the help of guides you’ll at least realise they’re not hidden behind a million hotkeys or tabs.
Unless you get inventive there’s usually 1 or 2 ways to do something, and that’s that.
I might as well address the elephant in the room: This game is soo dead you’re prob here because you’re REALLY bored, or clicked one of my links to this guide, by mistake?! Meh, well have fun skimming through.
CRITICAL PATCH ALERT / IMPORTANT ADD ON (24/02/25 Edit):
metallicafan212 has released their slow-selection fix for the Killing Floor Editor, this means no more waiting 10sec++ for almost every actor selection to register in SDK!
GitHub Release – metallicafan212/UE2SelectionFixes v0.3-Alpha-KF
If you JUST started with KF SDK and you don’t like my Basics section, here’s a video which isn’t terrible for beginners:
If you’re only interested in SDK but don’t EVEN know how to open it yet, this guide would be better to start with:
Steam Guide – Getting Started with SDK
If you’re dying for a community to chat with there’re at least a few semi-active KF1 mappers in this (Siren Torturers) Discord server:
Join Siren Torturers on Discord
ST also offers an edited SDK (KFEd) application which beefs a 2GB RAM cap to 4GB :O
Makes you wonder what kind of PCs TWI were rocking am I right..?
Anyway, I’ve used it, everyone at ST uses it, and it works grand, so consider it highly recommended . KFEd-4gb.zip Download
P.S: If the download makes you nervous you can also try edit the .exe yourself. Briefly discussed here:
Steam Guide – 4GB Patch Discussion
If you prefer to mod you could consult my guide but Lazy KF Wiki is a better place to start. Community: Official KF Modders discord. (KF2 modders expanded their discord for us, and help with favours from time to time so play nice please).
For an unofficial KF1 modder discord (Bungalow), ping a message my way and I'll see if I can get you an invite, same as before, play nice, read their rules.
As an aside, here is a tutorial of me developing a small map to completion, without the decorating unfortunately:
Last of all, if you hate my style feel free to instead rely on some of my extensive references listed at the end of the guide.
Otherwise let’s get started…
🗂️ Basics on Browsers
Once you’ve prepared a rough shape of section/s in your map (using cube builders, subtract and odd tools on the left side of your screen), 3 things that should get your attention are these little icons near the top of your screen:
[
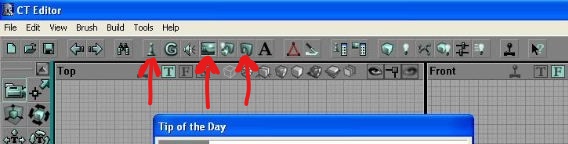
First is the actor class browser - chess pawn icon, next is your texture browser - a painting -, and on the right is the static mesh browser in the form of an arch.
The Actor Class Browser contains every invisible aspect of the map that directly or indirectly affects the player and their visible surroundings. A few examples include: To use them you have to highlight the name of the actor you want, right click on map → insert actor 'X'
The Texture Browser contains almost every surface 'wallpaper' used in KF maps (Image/Colour data). Just find the right one for your floor, wall or ceiling and apply it with a double click. FYI some are also converted into Materials, to be wrapped around StaticMeshes (SM). I won’t go into depth myself but regarding supported textures, transparency (alpha), and otherwise, reference this: https://docs.unrealengine.com/udk/Two/UnrealTexturing.html
//proTip: For custom texture stuffs download something like GIMP, you can easily import/export through Tex browser (.dds and x² dimensions required) then filter, combine or crop stock textures with more creative control (like for SMs). Also a cool tut here: https://forums.tripwireinteractive.com/index.php?threads/texturing-tutorial-thread.55519/
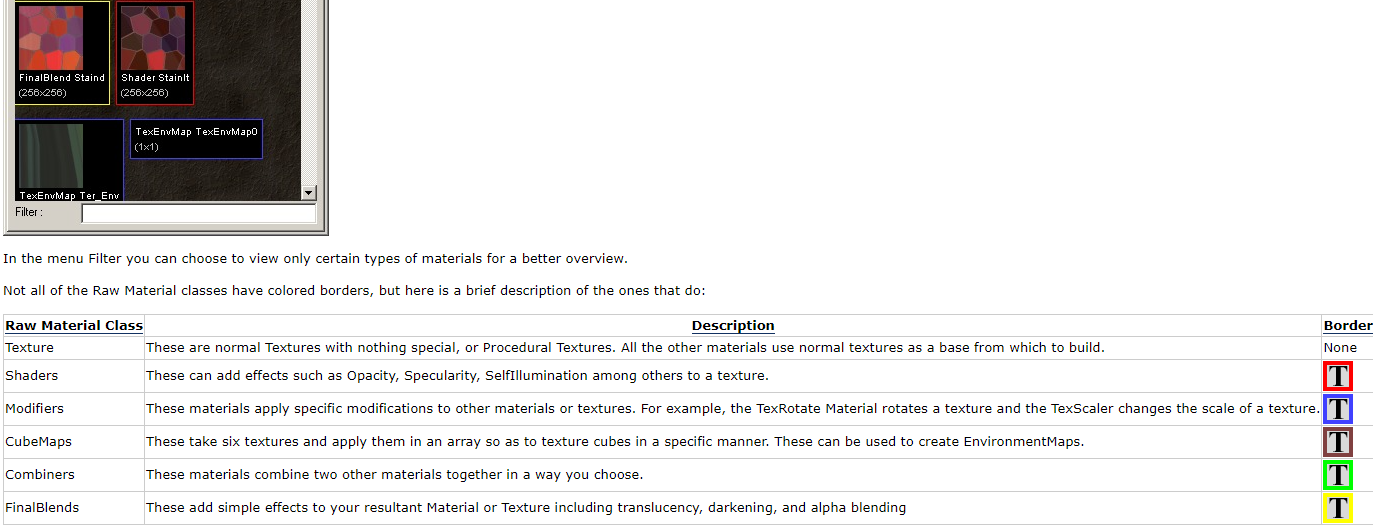
//proTip2: However, if you plan to mostly work with textures only for KF, for file size + optimisation it is definitely worth learning the inbuilt material classes (They do work!) → the Material Modifier is particularly simple to use and the UDN Site Map explains it well:
Finally, we have the Static Mesh Browser. Each Static Mesh is technically of the Object Actor Class AND they can also be applied to give other actors tangible form in game. But to simplify, SM (static meshes) are pre-made 3D objects you can place in the world.. Doors, tricycles, radioactive mushrooms and dosh for instance…
Although the shapes are archived, you can create simple ones of your own using an assortment of brushes in the editor. You just have to make a BSP structure, select all the coloured outlines known as brushes in the 2D viewports, or Wireframe in the 3D viewport, then right click → convert to static mesh.
Whatever textures you had applied to the object will save with the SM into a package of your choice ('myLevel' or your own custom package). You could also imagine them as recycled objects… You don’t have to start making them from scratch every time you want to use them, people can render and cull them in-game easier and it solves global warming! Thus, you can put as many copies of tricycles in your map as you like.
🧰 DeepDive – Assets
Static Meshes:
It turns out converting BSP to static meshes isn’t so great because complex BSP geometry is murder on your map's performance. The best, most optimized SMs are always designed in proper modelling software like 3DS Max and Maya, and they ofc have fees D:<
Alternatively, using stock map folders, you can take almost any SM from a KF map and use it, rescale (try to keep 3 only re-scaled variations max for optimisation), rotate and re-purpose to decorate your own. It relies entirely on radical ideas and improvisations (such as clipping decapitated heads over corpses lol) but also takes way less time than designing your own anyway.
So feel free to reference this SM spreadsheet I put together: 👉 SM Spreadsheet
If you want to help add to the SM spreadsheet, feel free to join the Siren Torturers Discord and inquire about it there because they formatted it way better than my stupid ass ever could xd
Stock KF map resources look better, and always will be yours for the taking. Just don’t forget to add your own original touches to your map.
Next is an optional section on 3D modelling for KF1 (skip to Texture Providers if not your thing).
Speaking of being sneaky, you could also use **Blender** to design static meshes as it’s well known, perfectly FREE, 3D design software.
The only drawback is they don’t support .ase or .lwo exporters **officially**. **And you’ll need to track down an importer separately.**

Try https://github.com/DarklightGames/io_export_ase

^After that open Blender, search in Edit Preferences → Install add-on, and once installed search in there for “asci” and tick it.
Now you can make simple, custom meshes and export them into KF (with textures separately) for free, but you won’t be able to import them from KF into Blender without other stuff xD. Whew.
- Alternatively, there’s like a dozen Blender exporters + tutorials here: https://web.archive.org/web/20140727193238/http://wiki.beyondunreal.com/Blender
- Milkshape (isn’t as good as Blender ofc) but has a built-in .ase exporter you can rely on.
- Here’s also some reliable looking, old 3ds Max downloads I found if it suits you: #1 + #2 (Even with a paid license it’s impossible to get, so no copyright infringement intended :c)
Once you have a (.ase .psk or .lwo) SM on hand, all you need to do is open the SM Browser, go to File → Import → Your SM and voilà!
If you want the custom SM to be downloaded by players in the map file, import it into the myLevel package when prompted. Otherwise, place it in your own named SM package, which will have to be downloaded alongside the map (only for the largest maps please, admins don't like extra packages).
IMPORTANT NOTE: If you’re modelling a mesh with multiple material instances / UVs, do test your exporter — a lot of them won’t work unless you have magic fingers.
Tip: Umodel is REALLY GOOD for bulk exporting KF assets. The same site also provides Un+ActorX plugins for 3DS Max import/export (see Porting Guide section for bulk exporters): https://www.gildor.org/en/projects/umodel (Found a vid too but maybe watch on 3× speed — he's underestimating our intelligence xd): https://www.youtube.com/watch?v=Uhky1b5YBoM
Texture Providers:
Assuming you have software like GIMP to convert file types to .dds, and follow the import rules (dimensions x²), here’s a small list of texture providers you may consider:
- Poly Haven
- Textures.com
- AmbientCG
- Texture Ninja
- OpenGameArt
- itch.io Assets
- Poliigon (these ones prob overkill)
- Sketchup Texture Club
Free textures galore!
General Tip:
If you import custom textures, consider the advice on the TWI mapping guide for final edits:
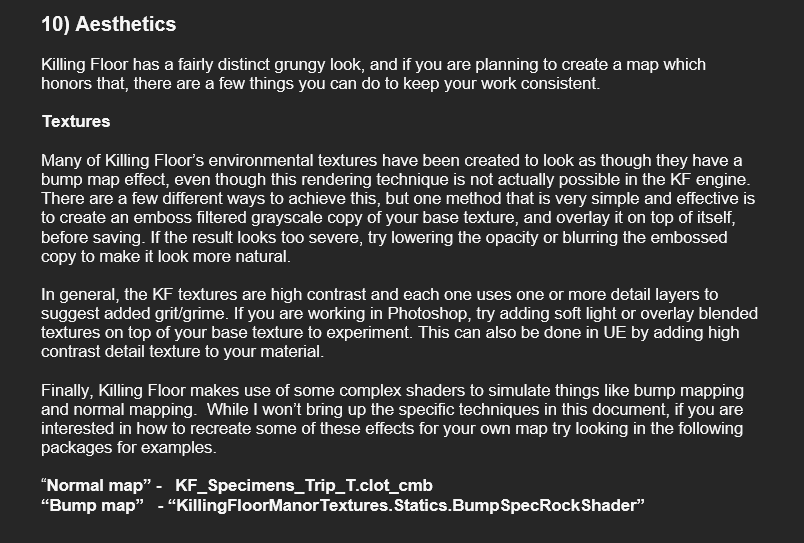
👉 https://docs.gimp.org/2.10/en/gimp-filter-emboss.html
However, rely on the game’s resources as much as possible (at least while learning). That means using static meshes and textures from official KF maps.
If you have those moments when you’re not feeling very creative — even when you know what to do next — it helps to browse through stock assets on “breaks.”
Don’t forget search engines and Pinterest have an infinite supply of reference images too 😄
🧱 Build and BSP holes
So, there's something you need to realise about how KF SDK works: The build button at the top right of your screen re-builds the whole map every time you ask it to, following the set of guidelines you give it.
Well duh. But this includes every brush you've ever added or subtracted. Go into wireframe by clicking the hollow cube icon above your 3D viewport and you'll even observe any old brushes you may have 'added' over.
So to sum up, you can use a "brush" that applies an effect and continues to persist even after you add or remove space with more brushes. Like a skeleton of sorts. To get fancy, this means when you edit a wall, you aren't moving the wall itself; you are moving the original, invisible brush primitive that created that wall. Now onto the juicy parts!
**<u>How can I use or abuse this feature</u>**?

Simple, this means to edit the walls and structures in your map, you only need to go into wireframe:

• Move a brush anywhere you want if a wall is in the wrong place.
• **Ctrl+C, Ctrl+V to copy walls/floors (or Shift+D to duplicate, thank me later)**.
• Perhaps even delete the brush entirely to redo that given space.
• Rotate the brush as you please using the actor rotate tool.
• Or go into Properties -> Brush, and change the brush type to add or subtract.

**All you need do is hit build geometry, or build all afterwards** to watch all those surfaces get remoulded as you please. Cool right?
*Now to think it took me 250 hours to figure out how to copy-paste a corridor, lmao ><*
General Build Scale
It's worth noting these examples of absolute minimum height dimensions: • Standing Player - 108 units. • Crouching Player - 76 units. • Crawler - 56 units. This chap has obtained slightly different (likely accurate) figures: https://steamcommunity.com/workshop/discussions/18446744073709551615/4520009742919820869/?appid=1250
Info such as this is handy to me when working on small sections but we should also use it as a scale. 216 = twice a player's height for example, so that would be an ok roof height. You don't even want to know minimum width because pathing just fails at these sort of dimensions so go 200+ :P
Honourable Mention: In regards to UE light-mapping it's directly tied to BSP brush size, so while it’s more optimised sometimes 1 big BSP brush isn't the answer.
Patching up the map (BSP holes)
BSP holes, you may have seen them, you may have heard of them. Tbh it got me so worried I almost gave up on a project. See the dark screenshot below? They're simply holes in your map.

CAUSE + SUMMARY
Happens when the editor gets confused by overlapping brushes. The best solution is prevention… First, always always always grid 2+
Second, if you want to create irregular shapes / transit style stairs -
OR
OR Vertex Editing (see guide section)
This tutorial also seems to have some juicy details: http://www.hourences.com/tutorials-ue1ue2-bsp/
A BSP hole won't show up every time you overlap BSP brushes. In layman terms it's like Schrödinger's cheese — you can't cut into a part of cheese that you've already cut away, and you can't fuse different cheese molecules together.
BSP holes also tend to work in either x-y-z planes (with some deviation). So the hole is not always adjacent to the cause. My best explanation would be invisible tears in space (so yes, you're breaking physics, unless it's quantum entangled cheese, yum). You may have created the BSP tear/hole years ago and made a super map since then! Sometimes you're just unlucky and you tap into that tear. :c
WHY DOES IT HAPPEN EVEN WHEN I DON'T OVERLAP BRUSHES
You are overlapping brushes, fractionally sized. The Editor is a [redacted insult] like that. It should auto snap brushes on grid when the setting is enabled (little grid icon at bottom) but going in and out of grid 1, while working with brushes, can confuse it. I think it breaks brush dimensions or pivot, and because UE2 is only capable of snapping a single brush vertex on grid at a time, it's stubbornly persistent.
Otherwise building fancy brush constructs with steep vertex editor angles, or freehand polygons can also do it.
FINDING THE BUGGERS
The best way to locate BSP holes is the portal view. Since BSP holes cut open the map they also split zones into fractions and you can see the change in colour, then switch to wireframe and there should be an overlapping BSP brush nearby in the x, y, z plane.
CORRESPONDING FIX
You shouldn't get to this step, prevention is key. If you're here anyway first ask Do I Fix It? It's only a BSP hole if you see it.
Those wormholes dynamically change as you fix them if you've got a whole hive of them too (or new ones apply during build), so at least keep track of file versions, and if it's tiny or out of sight you can leave it alone…
Otherwise, if all brushes are still on grid ensure you perfectly line them up surface to surface or re-scale one for your purpose while deleting the other. If your brush is on a half-grid or less, consider converting it into a static mesh, Brush → Type → SemiSolid or NonSolid through a right click.
Alternatively, your last resort is Vertex Editor. Consult Guide section to enable grid snapping. You can then right click off-grid vertices in the 2D viewports to snap them on grid (credit: Broski). It’s a last resort because the editor will just snap a different vertex off grid, so you're going to share in the trauma of spamming it over and over again.
You can also try typing actor align in the command box, or Edit → Reset → Brush → All,
but it's not as reliable.
Consider using Ctrl + Middle Mouse Button to draw a ruler in 2D and just replace the brush entirely (assuming your builder/red brush is fine).
Remember you can check portal view which is good for spotting BSP holes and their causes.
Wider Community Tips
In summary - act like a neat freak when designing your map, Grid 1 is officially the plague, and keep those file versions handy. That way even if you do see a BSP hole it won't be as complicated and you can probably revert the file anyway. Otherwise auto-save and go into portal view, then wireframe to find and edit the spot where you messed up.

// ProTip1 - Static meshes aren't BSP, so they will never cause a hole, and are a better option for decorations 99% of the time.
// ProTip2 - If a static mesh won't work, for example if good lighting on that decoration is important, consider using a semi-solid brush or non-solid + blocking volume via special brush tool, and then consider BSP last of all.
// ProTip3 - If a simple wall can be made with 2 large BSP brushes rather than 8, it can be better but I mention in Lighting that lightmapping is based on BSP size so keep cuts equally-ish sized if you can. Vertex/2D shape editing are still amazing tools.
// ProTip4 - Pick a big grid size that 90% of your map's BSP will be in, like 32 or 64 ish, and work in multiples of that number. You may be forced to make an exception at doorways by halving it but keep the rest as is.
🧩 Vertex Editor
The Vertex Editor tool is way better than I originally gave it credit for (sorry).
FIRST, vector snap must be turned on:

Hypothetical: Your existing BSP brush is too big, or shaped too regularly to pair with a different room or static mesh.
Use:
• Select brush. • Ctrl + alt to drag select (not in 3D viewport :c) or Ctrl + click to select 1 corner/vertex. • Ctrl + alt + shift to stack and continue selecting more vertices. • Preferably use 2D viewport to edit the dimensions as you wish so use hide actors for extra visibility as mentioned in tips.
⚠️ Warning: As mentioned, don't go crazy with angles, and NEVER turn off vector snap or you can rightfully embrace BSP holes and fall through the gaps between dimensions.
Bugs (if working with triangular BSP):

You can see this is likely related to jagged primitive collision, one solution in a similar case might be to break down the BSP into further horizontal subdivisions, I think I just remapped the pathing so they jumped outwards from each pillar, as opposed to in-between.
💡 Lighting
Rick-click, aah I’m getting sick of saying that, so it’s now “Rick”.
Rick on your map to place lights wherever he you like.
A wise man (named Rick?) once said lighting makes 90% of the atmosphere in a map. He's wrong, but it shows you his passion. Take Waterworks for example:

Beautiful.
Anyway, the placement is down to your judgment, but there are three critical settings for a light I can let you know about:
A light with low radius and high brightness will be like an orb of hope in the darkness, while one with decent brightness and high radius will provide good ambient light to a room.
UE light-ray tracing is pretty bad (more like realllllly bad), but if build lighting ends up compressing one of your lights way too much, just add more xD. I’ve seen other mappers stack multiple lights directly on top of each other, with different colours/radius/brightness. Official maps tend to spread multiple tiny light sources out to highlight certain spots, emulate more accurate tracing from the “light” static mesh, and add to the atmosphere.
THIS IS RUBBISH UNREAL ED NAMING OMG SO SAD… The float property Display → Scaleglow is NOT to do with ambient glow! It allows you to scale exactly how lighting interacts with your static mesh as a whole (UV). Sooo, pipe or skybox SM too bright for adjacent BSP? Lower that number. Jeez, I thought the only solutions were material modifiers, super small lighting radius or Special Lit :c
Honourable Mention: Always use RGB8 lighting in the build settings — it looks better and is more optimised than DXT3. Evidence: Omnipotents Forum
Honourable Mention 2: SDK permanently jacks up the gamma pretty high while launching. One workaround is typing -nogamma in Steam Game Properties → Launch Options.
You may notice properties for effects like torchflicker or phase, but don’t touch them:
Spoiler
they shouldn’t really exist…If you want an actual flickering or pulsing light, go into the Actor Class Browser and search for "Trigger Light."
Insert that with Rick, and then play around with 'Light Type', 'Phase', and 'Period' for the best results.
As mentioned above, I haven’t ever got 'Light Effect' to work in-game, despite appearing otherwise in the SDK preview.
Problems? → Beyond Unreal Wiki: Lightmap Errors
Coronas
Coronas are light/lens flare textures (not to be mistaken for the disease or brand of beer). They can be applied to lights in properties to make the light mesh seem more alive — but are often overdone, so lots of players disable them in settings. :c
To add a corona to your map, you could use a preset in the actor browser, but I usually add in a normal light then do the following:
Bloom
url=https://en.wikipedia.org/wiki/Bloom_(shader_effect) Bloom is a common cheap but fancy lighting thing that KF has integrated as an optional display setting, migrated from TWI's Red Orchestra 2 code-base. Credits to JK for digging up this old TWI forum snippet. [quote=Red Orchestra: Adaptive Bloom Guide] https://forums.tripwireinteractive.com/index.php?threads/bloom-dev-adaptive-bloom-tutorial.22304/
Red Orchestra: Adaptive Bloom Guide
RO Adaptive Bloom is manipulated by 5 settings: Contrast BlurMult Ratio RatioMaximum RatioMinimum
These settings are level specific and should be set in each level's properties in the editor (Menu:View->Level Properties->Bloom). Bloom may also be tweaked and tested in practice mode using console commands.
A note about gamma settings: When tweaking your level settings to look right, make sure to be running with the game's default gamma/brightness/contrast settings. Do this by clicking default in the graphical settings menu (and then configure the rest of the settings to what you like). Even the slightest deviation can look good on your monitor but blown out or too low on everyone else's monitor. It is proper practice to construct with default settings.
Contrast
ConsoleCmd postfxbloom_bpcontrast x
Default 1.0 Min 0.0 Max Infinity (I recommend no farther than 3.0)
BPC multiplies the pre-blur blooming image. BPC scales the 'leveled' image from the previous MBL. Raising the BPC past 1.0 pushes lower-brightness colors to be more likely to visibly bloom. BPC is the second value to affect the way a render will bloom and is pre-blur.
BlurMult
ConsoleCmd postfxbloom_bpcontrast x
Default 1.0 Min 0.0 Max Infinity (I recommend no farther than 3.0)
BM multiplies the post-blur blooming image. BM affects how bright the overall bloom will be once it is applied/added onto the source render (thereby creating bloom). A BM of 1.0 will have the blooming image with illumination values from 0.0-1.0. To keep the original image from going supernova (whiting out) in areas of high detail but high illumination, it is a good idea to bring the BM down from 1.0 to create a softer bloom. BM is the third value to affect the way a render will bloom and is post-blur.
Ratio
ConsoleCmd postfxbloom_ratio x
Default 0.5 Min 0.0 Max 1.0
Ratio is used to determine what should bloom on the screen and what should not bloom on the screen. Basically, ratio represents the approximate ratio (0-1) of the screen that one wants to be blooming at any given time in their level. Ratio is adjusted per-frame based on an accumulated average screen illumination value. The screen illumination value is the average brightness (0-1) of every pixel on the screen. A ratio of 1.0 will have every pixel of the screen attempting to bloom, a ratio of 0.0 will have no pixels blooming, and a ratio of 0.5 will have approximately half the pixels on a given frame blooming. Ratio is capped by RatioMinimum and RatioMaximum before it is used.
RatioMinimum
ConsoleCmd postfxbloom_ratiomin x
Default 0.0 Min 0.0 Max 1.0 (One should make ratiomin no greater than ratiomax)
RatioMinimum limits the adjusted Ratio to be greater than or equal to this value. If Ratio is less than this value, Ratio will be changed to equal it. Adjust RatioMinimum to a higher value if your bloom vanishes when Ratio adapts to looking at bright objects that you still want to bloom. Setting RatioMinimum to a value of 0.2, for example, will cause approximately 20 percent of the screen to bloom, even if you're looking at a pure white object/scene.
RatioMaximum
ConsoleCmd postfxbloom_ratiomax x
Default 0.5 Min 0.0 (One should make ratiomax no less than ratiomin) Max 1.0
RatioMaximum caps the adjusted ratio to be less than or equal to this value. If Ratio is greater than this value, Ratio will be changed to equal it. Adjust RatioMaximum when your level has spots in which objects will bloom that should never bloom at all. For example, maybe a part of the ground has pebbles. If these pebbles have a great amount of contrast, portions may bloom and other's not. Sometimes this effect would simulate a specular bloom, which is good, and other times this just looks funny. In this event you can lower the ratio maximum until the pebbles stop blooming. (Altering the Ratio value is another solution that would give similar results without forcibly lowering the entire scene's maximum bloom)
Dynamic Lights
Apparently, I was mistaken; manually triggered lights do work, only players with “dynamic lights” disabled won’t see them.
Find a TLight in the actor browser, set it up how you would like, go into Properties → Object and enable Trigger Toggles.
Add a tag to the light (like for a mover) and trigger it with a corresponding event. Build Lighting and you're a happy camper. However, shadows won’t be nearly as prevalent as they are for other lights.
Example: In KFO-Transit, the first keycard door has a small red light that turns off and a green one that turns on. In KFO-Foundry, you’ll also see something extra, a scripted trigger that spawns a corona headlight actor (a preset corona).
Where you’ll find them: somewhere in the Actor Class Browser, xd.
I kinda wanna recreate the stereotypical parking lot one day — flip a switch and all the lights turn on with loud sound effects, row by row (Bruce Almighty?). But I guess the shadows and lighting would self-destruct in this engine.
Bonus Fluff
For fog, FIRST disable TWI’s buggy override — it’s a broken setting in Zone Info, so use SPLevelInfo instead:

Note: This also stops zeds from spawning (only in the editor quickplay, not solo/live).
If this is inconvenient, re-enable that feature in Edit → Level Properties:

Now you can place a Zone Info actor, enclose the “room” you want with zone portal brushes (link zone section), and go into:
ZoneInfo Properties → ZoneInfo → DistanceFog = True
Then in ZoneInfo Properties → Distance Fog, edit color, fog start, and fog end.
It’s mainly for optimisation outdoors, but many maps use it for lighting too. You can tint ambience, darken scenes (try dark grey 1:24:24:24), but test thoroughly — it can easily look bad.
Also note: fog boundaries between rooms are broken (based on player location, not line of sight).
Spoiler
Ambient light is covered under **ZoneInfo Properties → Lighting**, but it looks ugly — best not touch it.// ProTip: Every light looks a little ugly without coronas, but even in small rooms it’s overwhelming if every light has one.
This is where artistic vision comes into play — which lights should be most impactful?
// ProTip 2: While somewhat excessive, Ferenos knows what he’s doing with lighting.
You have to simulate at least basic reflections/diffraction with smaller light actors everywhere, otherwise shadows look way too dark.
🗺️ Level Design
Ah the cursed topic of experts and fools alike..
Level design is an art. If you think your map naturally looks like trash don’t despair. It’s a learning process. Despite your skill level the feeling may seem never ending (look up imposter syndrome) so its important to just have fun.
You should see what the first drafts of my KFO map looked like, yeesh (oh yeah, I’ll prob still never release it xD)
These next sections include my key thoughts/reference. If you’re here for tips and tricks I have this clickbaity thing hidden behind my ear: 👉 https://www.gamasutra.com/blogs/TomPugh/20181022/329044/Level_Design_Tips_and_Tricks.php Ew. I suppose that could work for you.
You NEED a theme and/or narrative (before/after outbreak)
Browse through your camera roll, Pinterest, GettyImages, historical eras, historical events (doesn’t fit lore but who cares xd), memorable places, movies, books, shudders other games and so on. This should help you pick a setting including theme (e.g: wintry maze-like wonderland, horror sex dungeon etc.). Consider an emotion-based theme (curiosity, spooky, comedic, ironic [wait that’s not an emotion…]) and build a mood board by gathering plenty of reference images.
TIP 1: KF is gonna be gritty and hard themes obv. TIP 2: You can also consider easy cataloguing software like Allusion + PureRef:
Planning
Your time is priceless, so the idea in standard GameDev is every asset supports your main theme, narrative or core mechanic. It might be cool to squeeze a fancy church cloister into map A but just put it in a notepad and design a different map at another time where a church is more relevant.
So how does a plan full of rectangles even envision a theme? I’ma fall back on experts here v24 (see below):
Optional/KFO
Lighting Note
For planning in this GameEngine, note the honourable mention for lighting: lightmapping is based on BSP size. So, for consistency, any bigger rooms should be split into equal-ish sizes of BSP brushes while developing your map.
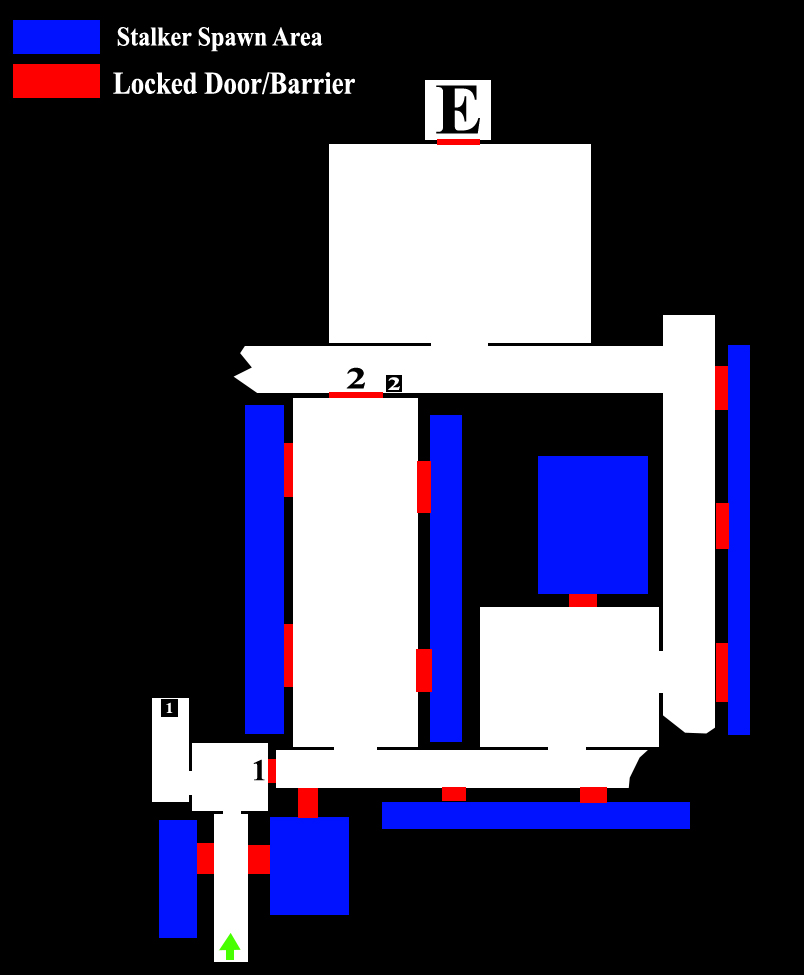
Sketches or low quality 2D blueprinting also help. Here’s an early plan me and my partner used for our KFO map (what is it missing?):
Dimensions
Don’t be like every other average Joe — plan like you’re drafting blueprints as an architect (although not as pretty as them). You’ll make life easier down the line.
As for KF planning → Follow this dude’s advice (he sounds smarter than me):
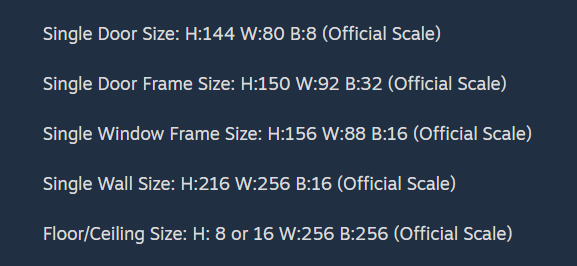
Keep everything simple and wide (>200 width for walkable SM, >256 for BSP). This helps both the dumb specimen pathing and player navigation.
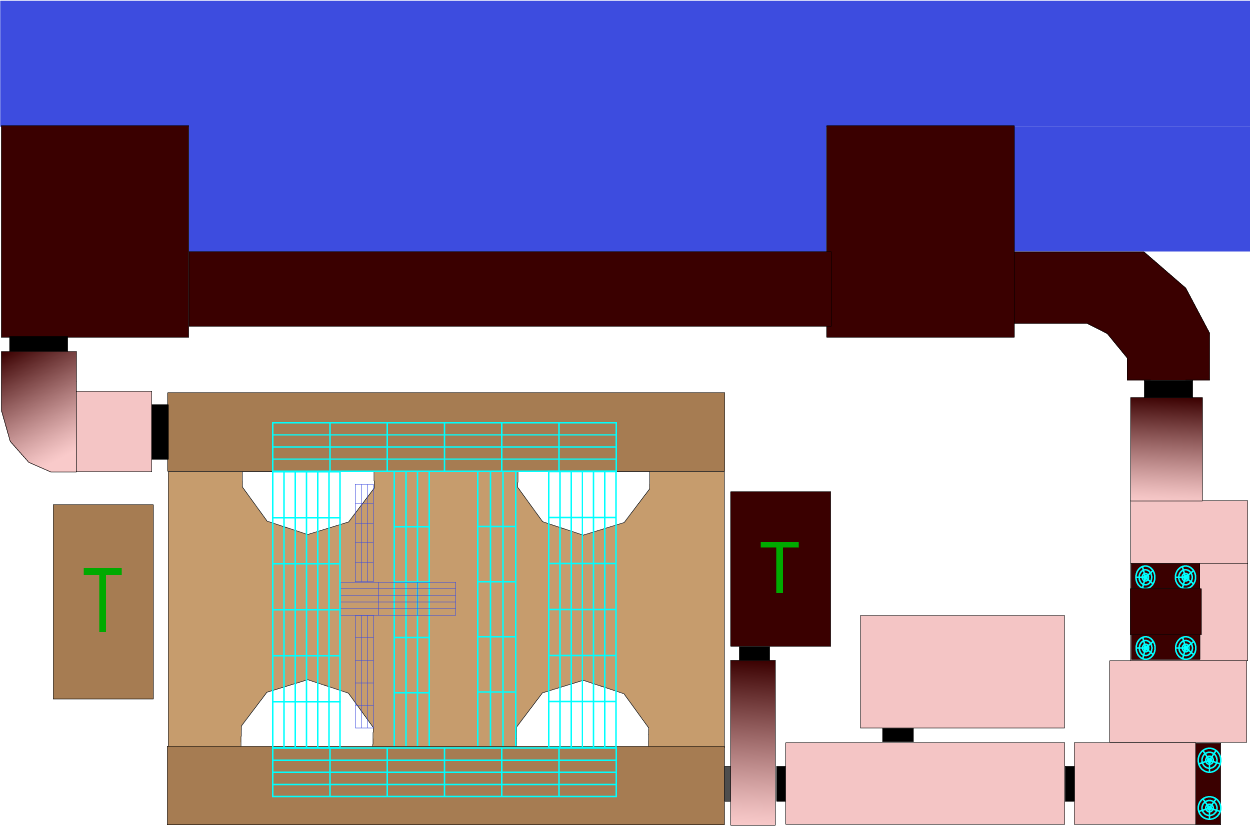
Also build in sightblockers — good level design naturally optimises performance. Use valleys, walls, or fat decorations (for antiportals) to limit render load.
Example:
Greyboxing
Now you can build a Greybox/Whitebox map. Slap in the basic geometry, doorways, spawns and paths, then focus on how it plays.
Are there a billion dead ends? For example, observe the design above. My final map implements at least 2 more rooms. Role-play as an alien/1st timer, do parts frustrate you? Ignore SM and decorations for now, once you properly start you just spam ctrl+c & ctrl+v anyway. Stress-test the pathing (w10+ spam). Can you mix fun pathways without breaking kf-pathing (no xD), can you theoretically or literally punch holes in walls to compromise?
Always underestimate KF pathing.
Custom Assets & Lighting
You’re unlikely to make your own SM/3d model assets as a beginner (or with 2010 software), so stick to textures/sounds for custom stuff. Build a test map for combining/utilising/scaling assets in isolation.
Lighting is a super powerful tool but also a crutch, so do it last. To support your theme easily, pick a hue and mess with saturation + brightness :P
Pro Tip: If you already know your theme, feel free to do lighting before texturing. Pro Tip 2: If you need it:
KFSlot_Ammo_Pickupfrom Frightyard — 100% consistent ammo spawns regardless of difficulty (credit: braindawg)
Bonus Stuffs
What’s the point of making maps if you can’t have a little FUN? Easter eggs are a great way to encourage players to explore and appreciate your map’s decorations.
Example: KF-SawnOfTheDead

10/10
It plays on everyone’s mutual hate of sirens using stock decorations projectors cleverly disguised as light.
Well optimised, no extra downloads required.
As mentioned in the Optional Video, interactable and relevant parts of a map (doorways) should be highlighted in some way.
This can be done with brighter lighting (/projectors), pickups used as breadcrumbs, SM’s such as pipes, fences, textures or if you think like an artist, guiding lines of path-like geometry (Composition baby).
Basically the guidelines could even be sound.

Never forget, Players are DUMB. (Delightable Underwear Munching Bums), so leave more than 1 clue for pity’s sake.
💥Collision
So, bumping against meshes or invisible walls that prevents players from breaking your map, and jumping out of bounds… This can be a minor thing to worry about. But it’s also essential to a player’s in-game experience, so don’t be fooled into ignoring it.
First, it’s important that YOU recognise almost all the meshes come included with their own collision already set up for you. By going into Properties > Collision you can directly edit what they collide with and what they don’t, under limitations:
Well, that’s it. Set those properties to True/False as you wish and see fit. Simple.
But, what if you want to block off an area to players but not zeds? What if the collision on a static mesh just doesn’t cut it? We can’t just have people going wherever they want. Specimen pathfinding in KF1 is already bad enough without players jumping across rooftops or wandering into their spawn points! So this is when you want collision volumes.
It’s important to recognise where you use these. Usually you should place a static mesh or platform of some kind to seemingly “block” off the player. But extend a blocking volume (NonZero Collision) much higher up than someone can be expected to jump. Otherwise I’d walk up to a perfectly normal piece of ground and hit an invisible wall, get frustrated, cornered by zeds and killed. Don’t. Break. Immersion.
So without further ado:
Blocking and ZedZone Volumes
Yup, those are what you want. If you’re familiar with the cube, cylinder builders and brushes then all you need is to mould the shape of collision you want, and instead of hitting subtract, look further down for a translucent blue cube tool and Rick/Click it. (image or vid or gif?) This should bring up plenty of options but for this section I’ll just highlight these two:
- Blocking Volume — Blocks both specimen and players (all NonZero extent). ^By navigating to Properties → Collision → Class Blocker, you can block specific “classes” like KFMonster (Zeds) or dosh actors. (quick example?)
- ZedZone Volume — Blocks players but NOT specimen by default. Useful for spawn points.
If you want an example of how you shouldn’t misuse these volumes if you can avoid it, check out some lesser-known custom maps or KF-Stronghold in SDK. Whereas not using them enough generally turns into something like this:


🎯Triggers
I'll keep this section brief, using the actor browser, you can select an assortment of triggers to use. Just bear in mind that not all of them will work reliably in KF.
Now that that's over, triggers are blatantly simple, go into actor class browser > trigger. And you'll find an assortment. I like things simple, so the ones I've stuck to (and coincidentally most KF mappers have used) so far are: actor class browser > trigger > trigger > KFProxyTrigger actor class browser > trigger > Use Trigger > KFUseTrigger
Usage:
- Place it where convenient, if it's a KFUseTrigger, place them centrally in the door and a ProxyTrigger would be on or next to something important in your level.
- Go into properties → Events, name the event of the trigger something simple and explanatory that you won't repeat ('Door1A' for example).
- Make your trigger actually do something by giving your lucky chosen actor or mover (The Target) a Tag of the same name ('Door1A').
- You're done. This can be used to play sound effects, activate a scripted trigger, complete/activate objectives and it works for movers with the corresponding Tag too.
–––––––––––––––––––––––––––––––––––––––––––––––––––––––––––––––––––––––––
Rick / m2 on the border of your 3D viewport -> Actor -> Radii view. This brings up a red radius of your trigger's range, which is most useful for the KFProxyTrigger. The radius of a trigger can be edited in properties -> Collision -> collision radius / collision height.
–––––––––––––––––––––––––––––––––––––––––––––––––––––––––––––––––––––––––
Side Note: plenty of actors like movers can trigger events as they do their thing (look into sections of their properties), if I went into all of them it would be a pretty extensive and boring guide but just understand they work the same way. The trick is using them to link to different tags and cause "events" in a variety of different ways. e.g. a given alarm sound effect event, triggered by a door opening.
SideSideNote: If there was a third trigger I'd like to learn how to use someday it would be the shoot trigger. It does work (KFO-RE-Mansion and KFO-WestLondon use one) but it looks finnicky so good luck.
4thSideNote (credits to ST): KFMusicTrigger. You can copy it from another custom map just to get an idea of how it works. Vanilla maps don’t use it.
⚙️ Movers
Now that you’ve started getting to the bare bones of the map, maybe you’ve decided you want a door, elevator or a Moving - static mesh. Yep, those are movers. And yep, it’s pretty much limited to linear motions, so if you want anything more advanced, build an animation.
To get a mover working sounds simple in principle — you give it numbered key positions (or key numbers), then tell it to move based on a trigger of any kind. It could also loop endlessly, but some of us can get stuck. “Whaa? How? Come on Help us Batman you're our unpaid intern!”
Well, your first step is to assign the mesh as a mover. Technically, you may be able to do it in advanced properties, but I only ever tested that once.. and never again lel.
Building The Mover
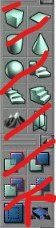
First, highlight the SM you want in the mesh browser, then click the rectangle with 4 arrows as shown above ^^ (Oh and if you Rick — right click — you get to choose between advanced mover types).
Great, now SDK has inserted a perfectly normal looking mesh somewhere in the middle of where you last left your red, active brush.
Grab the mover, place it exactly where you want it to start, then Rick → Mover → Key 0. What you’ve just done is let the map know the starting position of the mover, so go ahead, Rick, and do the same thing again, but select Key 1.
KF SDK is now going to record where you move the mesh, in a linear manner. So re-position or rotate the mover, and keep that motion simple, because if you want advanced movements, you repeat the process with Key 2 and so on.
Now, the mover knows where it should go but it still needs to know When… :o
When to work???
Naturally, this is when you Rick and go into its properties:
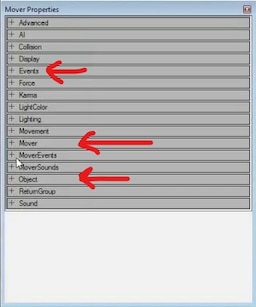
Among the tabs this opens up there are 3 vital ones:
- Events — Where you can assign a ‘Tag’ to the mover, linking it to any event that may be triggered by something else.
- Mover — Which entails how long it will take to move through each key, and any delays.
- Object — Where you tell the mover what makes it move and how it moves.
Vital Points:
**KFUseTrigger** is exclusively for KFDoorMovers.
**Encroach** - is a setting as it sounds, players and specimen can get in the way of movers, so this tells movers what to do if this occurs.
Just bear in mind 'ignore when encroach' can cause phasing through objects or players D:
**StayOpen time** - there’s a preconfigured mover setting in 'properties -> object' that takes the mover to its final keybind then returns to key 0 after a stated amount of time.
Stay open time is just another setting hidden under 'properties -> mover', that customises how long a mover stays in the final key position.
**Trigger Toggle** - will go through all the key positions in one motion, until the final one, then it only goes backwards through the same key positions to key 0 when triggered a 2nd time.
It’s rather tedious to explain more settings, but if you’re interested you can find them all, in detail, on the UE2 site map: https://docs.unrealengine.com/udk/Two/MoversTutorial.html or Lode’s guide: https://lodev.org/unrealed/movers/movers.html
🧭 Pathing
Well, Rick/Mouse2 in the corners, the central parts of corridors, and insert path node. Done, ez, gg.
If only — xD
Up on the top border of your 3D viewport: Rick → View → Paths Then Build All / Build Paths.
Now you’ll have lovely colourful representations of the routes zeds can take — looks something like this:
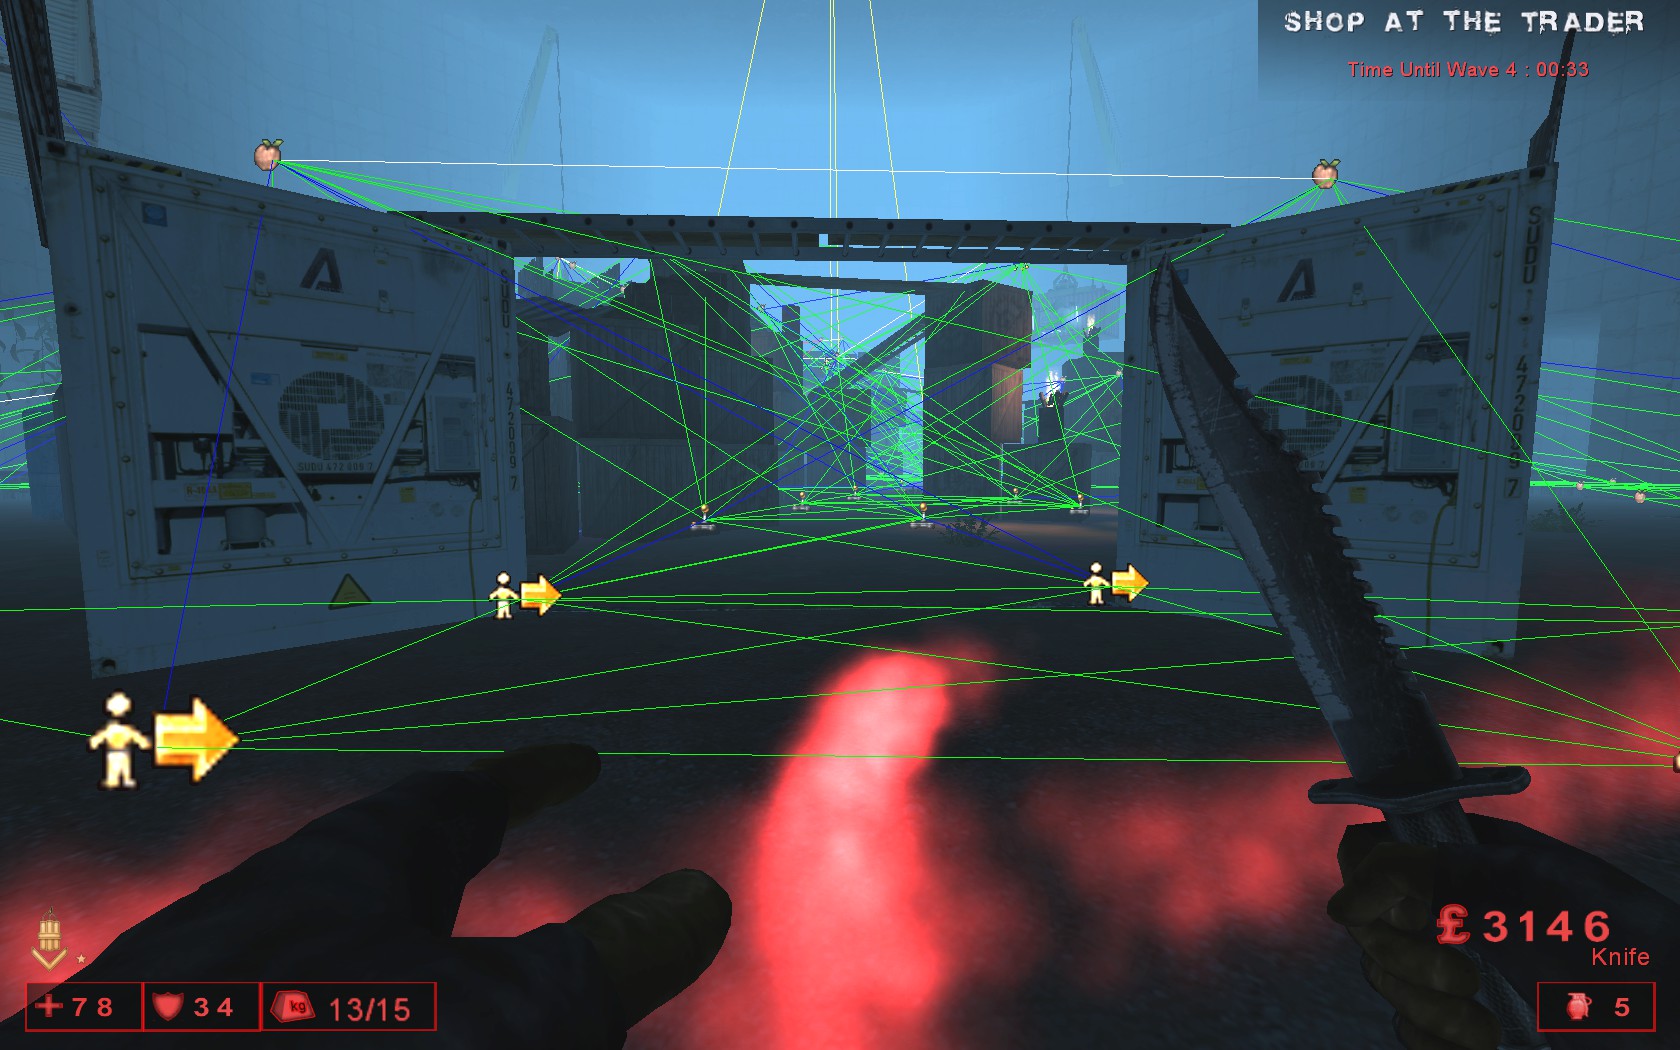
The different path colours are the editor’s way of showing how good each route is, how wide it is, and what it does. Here’s the gist:
Orange - Flying path, narrow. Light Orange - Flying path, wide. Light Purple - requires high jump (higher than normal jump capability). Blue - narrow path. Green - normal width. White - wide path. Pink - very wide path. Yellow - forced path. Red - "one-way" path (i.e. path going from node A->B, but B->A is proscribed).
^Now I had to grab this info from a UE3 site because documentation is so scarce, but it’s correct and triple-checked, also against the UE2 site map, lol.
If you have a blue path, you should try your best to rearrange the level or navigation points until it turns green. Keep path node placement clean, keep your lanes wide, only place pathnodes where needed, and give them enough space for a crowd — pathing will remain clean and consistent.
If zeds fall off platforms like stairs or pathways, the issue might be:
- Misplaced pathnodes
- A path that needs to be proscribed (disallowed)
- The section being too narrow (try widening it)
Or, just add railings 😛
And of course, sometimes — such as in the case of my KFO-BossArenaNerf map — you might feel that even though zeds fall off platforms occasionally and you’ve done your best to give them a clear route… Bad KF pathing can make a map fun. Who doesn’t want to see a menacing Patriarch charge at you, only to fall off a plank mere inches from your face?
FUN.
Notes to add: I’ll add more to this section maaaaaybe, if I feel like it. (ADD VIDEO?)
🧟 Spawn Points (Zombie Volume)
For setup... Similar to BSP, first arrange the size + position of your active (builder) brush. Then rick this tool to select your volume.
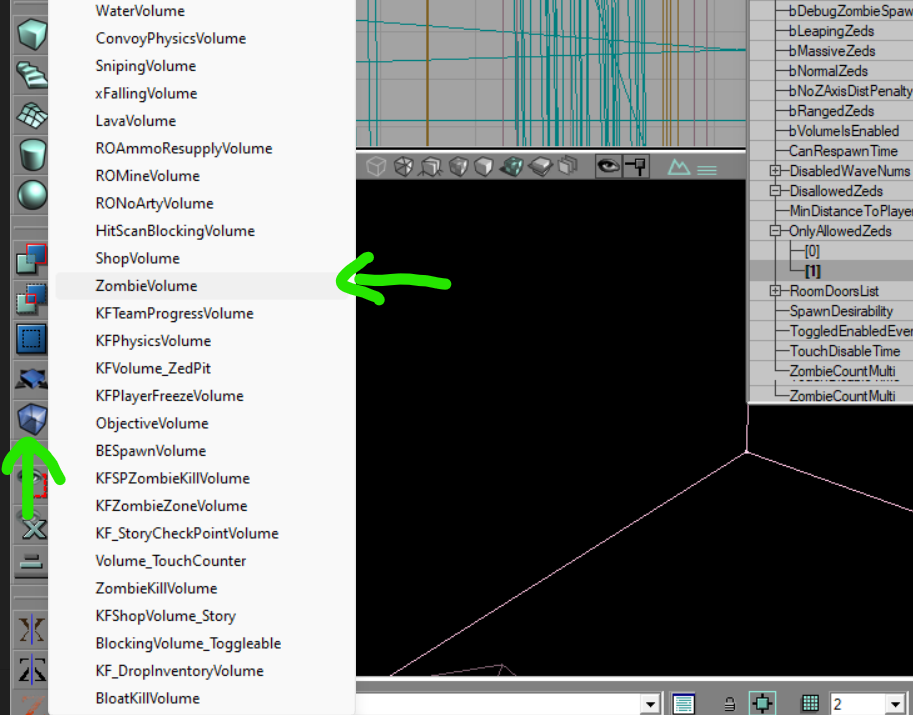
Following on, unless you’re making a KFO map (don’t xD), leave the Tag alone and focus on Properties → ZombieVolume:
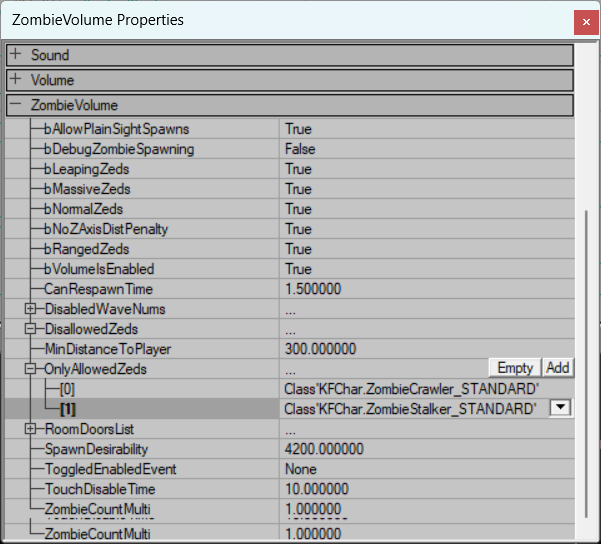
Custom Stuffs:
By default it works perfect, but there’re 5 properties here I’ve edited for extra functionality:
1. AllowPlainSightSpawns I’m only ~80% sure the code works, but enabling it never hurts during setup/testing. I have it enabled in the final release because spawn volumes are rubbish at recognizing SMs as sight blockers and I know this spawn is always hidden from player view anyway so it’s mostly a precaution.
2. MinDistanceToPlayer Self-explanatory ofc, this is the minimum distance (in straight-line x,y,z) between the ZVol and Player before proximity disables that spawn.
3. NoZAxisDistancePenalty As mentioned in the actor’s script, this ZVol won’t factor height (y) as a disabling distance. I have it enabled in this example because the zeds drop from a very high location.
4. SpawnDesireability
KF runs its own algorithm to decide which spawn gets priority (usually distance-based).
This property lets you influence that behavior.
Default is around 3000 — I might raise it to 4000 for neglected spawns during testing, but rarely go below default.
Take care, but experiment ofc. Balance is important.
5. OnlyAllowedZeds It's self explanatory I simply wish to emphasise it works. No broken TWI code here xD My example volume is small, but big enough for Stalkers :p Sometimes I disallow Bloats if the pathing is bordering blue coloured.
💡 Pro Tips:
- Routes from ZVolumes should always be green. specimen are sensitive after spawning and need wide paths.
- Partial distance fog (even if not opaque!) or blocking volumes count as LOS blockers if visibility is a problem for spawns.
### <u>*Problems?*</u>
- Rick your viewport headbar -> view-> paths to make sure your path hasn't deleted itself (it happens).
- Increase CanRespawnTime (3.0 should be good absolute minimum).
- Use Default values for other settings such as SpawnDesireability.
- Use Vertex Editing to expand your ZVol (+room).
- Use Sightblockers or compress your ZVol (assume bAllowPlainSightSpawns doesn't work).
If problematic you can then explore force path as an option (discussed in pathing).
- Ofc if bored of debugging building a new volume very often works for me.
🏔️ Terrain
Getting it to Work:
When adding terrain to a map, first thing you want to do is follow this here URL: https://docs.unrealengine.com/udk/Two/CreatingTerrain.html
Summary: It’ll say you need a “room” closed off with zone portals (or just a room on its own), and then put a ZoneInfo actor inside there. Go into ZoneInfo → Properties → mark the zone as TerrainZone = True (without this step your terrain will never work)
Then you should first pick a texture you want for terrain, highlight it, then click the terrain tool on the left side of your screen → make new terrain (the little new page icon). Then label your new terrain (heightmap texture) as you like, in the myLevel package. This will make a TerrainInfo actor where your camera currently is…
Next stay on the terrain tool → GoTo “Layers” tab → make new layer (new page icon on the right side this time).
It’s explained in that URL that you should leave properties of the new layer as default, but one thing that KF REALLY loves to do is set “U Scale” and “V Scale” to 0 by default when you make the new layer. ^This is the scale of your repeating texture applied to terrain, so it should absolutely NOT be set to 0. Otherwise, your terrain will work but appear invisible D:<
Moulding Terrain:
If you follow that advice, your terrain will work and appear in the map. Now you can start playing with the terrain tools explained here: https://docs.unrealengine.com/udk/Two/EditingTerrainMaps.html
Additional Notes: I usually use paint brush (followed by smoothing) because it’s easiest. Set strength to a little under 50,
- Ctrl + Left Click (M1) to paint mountains/hills,
- Ctrl + Rick (M2) to carve valleys. If you make a good hilltop but it’s too small, you can try selecting it all with vertex edit (Ctrl + M1, then Ctrl + M1 + M2), shifting your mouse upwards — this raises all terrain nodes, so you’ll then need to go into smoothing + paint to fix transitions.
This is when you should be practicing terrain shapes a LOT and my God I hate it, it’s always 10× laggier than normal SDK and crashes 3× as much.
TERRAIN USER/BUG FIXES (FOR EMPHASIS) 🚨
When getting terrain to work, your TerrainZone setting in ZoneInfo actor should always be set to True like this:

And your TerrainInfo actor → Properties → TerrainInfo → Layers → Layer 0 MUST have:
- An applied texture for the terrain,
- A heightmap AlphaTexture for that layer (SDK updates this automatically)
- Positive values for U Scale and V Scale, like shown below:

If your terrain is built, you’ve followed the previous steps, and it’s still invisible — go into your terrain tool, select your layer under the Layers tab, select “paint,” and paint the texture of your layer onto the terrain with Ctrl + M1.
Terrain Layers:
After you’re happy with your terrain shape, you can apply different texture layers that blend into each other by looking at this link: https://docs.unrealengine.com/udk/Two/EditingTerrainLayers.html
As you can see I rely on UDK Two Site Map a lot because it’s usually accurate to KF SDK.
To do:
- Deco layers... Anyone reading can just reference UDK-Two for now.
⚙️ Scripted Triggers
These handy little things are scary, but simple — and you can find them in the actor browser: Keypoint → AI_Script → Scripted Sequence → Scripted Triggers
Rick on them to bring up their properties, navigate to AI Script → Add. Use the little dropdown menu and you’ll get an idea of everything an ST (Scripted Trigger) can do.
**These actors allow map developers greater manoeuvrability mostly in story/obj maps**
due to the nature of how complicated they can get.
But the way they work is like simple code or *blueprinting*.
Add some commands into a chain of “actions” to get STs to interact or do anything you want around players mid-game. Here are the important commands you can practice with:
| Command | Description |
|---|---|
| Wait_For_Event | Start with this 99% of the time. Any trigger gives off an event due to player presence or whatever… Bam, this thing detects it and initiates the next scripted trigger action(s). |
| Display_Message | Displays a white message like story maps do, very good for debugging! Set bBroadcast = True, importance = Critical to display to all players. |
| Spawn_Actor | Spawns actors at the ST (story maps use this to spawn specimens at set times). Use the dropdown to pick kfmod.Gorefast_STANDARD or similar. ⚠️ Don’t pick any specimen names without “_standard” or they won’t work! |
| Go_to_Action | When done with the chain, you usually tell it to go to action 0. Can be used for loops, but obviously, loop it infinitely without timers/delays and KF will crash. |
| Trigger_Event | If one trigger isn’t enough, you can link multiple STs, or use a timer with this command to trigger a new event (e.g. collectible rewards). |
| Play_Sound | Plays sound files (like explosions) at given times/locations. |
| Play_Local_Sound | Same as above, but commands the client to play the sound locally at a fixed volume. |
| IfCondition | Your “if” statement. Navigate to Triggers → triggeredCondition to find an actor that toggles a condition when triggered. If the tagged condition is disabled, the script skips to the next EndSection. Note: Works only if all Condition settings are True (starts enabled). |
| IfRandomPct | Enter a number between 0 and 1 — the probability that the next actions execute. If false, the ST skips to your next EndSection. (Seems to return true more often — test it yourself :c) |
| EndSection | Used with “If” actions, tells the ST which action to skip too if the 'IfCondition' wasn’t met. |
💡 Important Note: All hidden actors are destroyed by the host on game start (idk how other triggers work but…), meaning the host reads and saves ST scripts before gameplay. So, destroying an ST actor (for instance) mid-game won’t do anything. If you set up a loop using GoTo, it either loops forever, or you’ll need to manually end it using “If” commands or by disabling the script.
For an example of use, check out my KFO-BossArenaNerf map and see if you understand what's going on there, (I've got to advertise my own stuffs at some point) lol. Otherwise storymaps are very good.
💢 TWI Strikes Again!!
KFUseTriggers are pretty much exclusively for KFDoorMovers, STs ignore their events, as does everything else.
Maybe it’s explained in the script, but still… specific naming like KFDoorTrigger would’ve been much clearer. 😤
Workaround: If you need a player's use key to activate an ST, use a standard Trigger actor (not a KFUseTrigger) and set its bUseTrigger property to True in the Object tab. Probably.
☁️ Zone Info (Sky, Terrain, Fog)
Hi,
If you're starting with KF SDK mapping I recommend not touching the zone info actor at all, since it can cause issues (Edit: Those issues are mostly due to TWI, consult SuperTip1) So grab your actor from Info? -> ZoneInfo..
In short: ZoneInfo is an actor that lets you edit the properties of a “zone” in your map. A zone is any enclosed space you’ve cut off from others with portals. (Portal usage discussed in Optimisation LINK; They are hidden actors, not to be mistaken for teleporters, (although they technically can function as one it's not at all seamless lol)) If you don’t add ZoneInfo, the game just applies default settings to the zone/area.
✨ Why Even Bother?
There are technically a bunch of reasons. Controlling ambient brightness, setting up multiple skyboxes, or applying universal mesh cull distances — but since UE2 is a temperamental baby, I’d just use ZoneInfo for three things: terrain, skyboxes, and distance fog.
🟩 Terrain
If your terrain isn’t showing up in a certain zone, you’ll need to set the property ZoneInfo → terrain zone = True.
Now, even if your terrain cuts through other zones (through an entranceway or cave maybe), it’ll render properly there. Without? Invisible. Non-solid. No more need to smash your keyboard.
🌌 Skyboxes
A skybox is an isolated room that provides a live 360° camera feed of the sky around your map.
To make one work, insert the ZoneInfo child actor:
SkyZoneInfo
Sounds kind of like what Skyfall is for James Bond right? This is the camera for your skybox. Once you’ve built and positioned it inside the skybox, you usually don’t need to tweak its properties. Yay! 🎉
Spoiler
The “camera” is just *really zoomed in*… so have fun with that :)🌫️ Distance Fog
Yep. it’s exactly what it sounds like.
Enable with:
ZoneInfo → DistanceFog=True
Then tweak:
DistanceFogStart
DistanceFogEnd
DistanceFogColor
A smaller gap between Fog Start and End = thicker fog. You can even set a negative Start value if you want to get creative. And for colour (yes, colour, not color), use byte values 0–255 for hue, saturation, and brightness.
💀 KillZ (Don’t)
If you somehow end up with a massive void under your terrain, please don’t rely on:
ZoneInfo → KillZ
Sure, it’ll kill anything that falls below a certain Y coordinate… but I wouldn’t trust it. Use vertex editing or a KillVolume (or both) instead. KillZ is a last resort for desperate mappers watching zeds sink into the abyss, eating performance as they rave it out beneath your map. 🙃
⚠️ Known Hiccups
Translucent meshes can block emitters and other translucent materials in your skybox when viewed through BSP — especially fog or clouds. There’s no known fix (thanks, UE2). So test early, preview often, and maybe the SDK gods will bless you.
That’s all folks (for this section) 👋 ...
✅ Objective Mode
If you’re reading this you’re insane, and you should know you’re in for a world of pain. I’ll try ease your suffering:
The Objectives
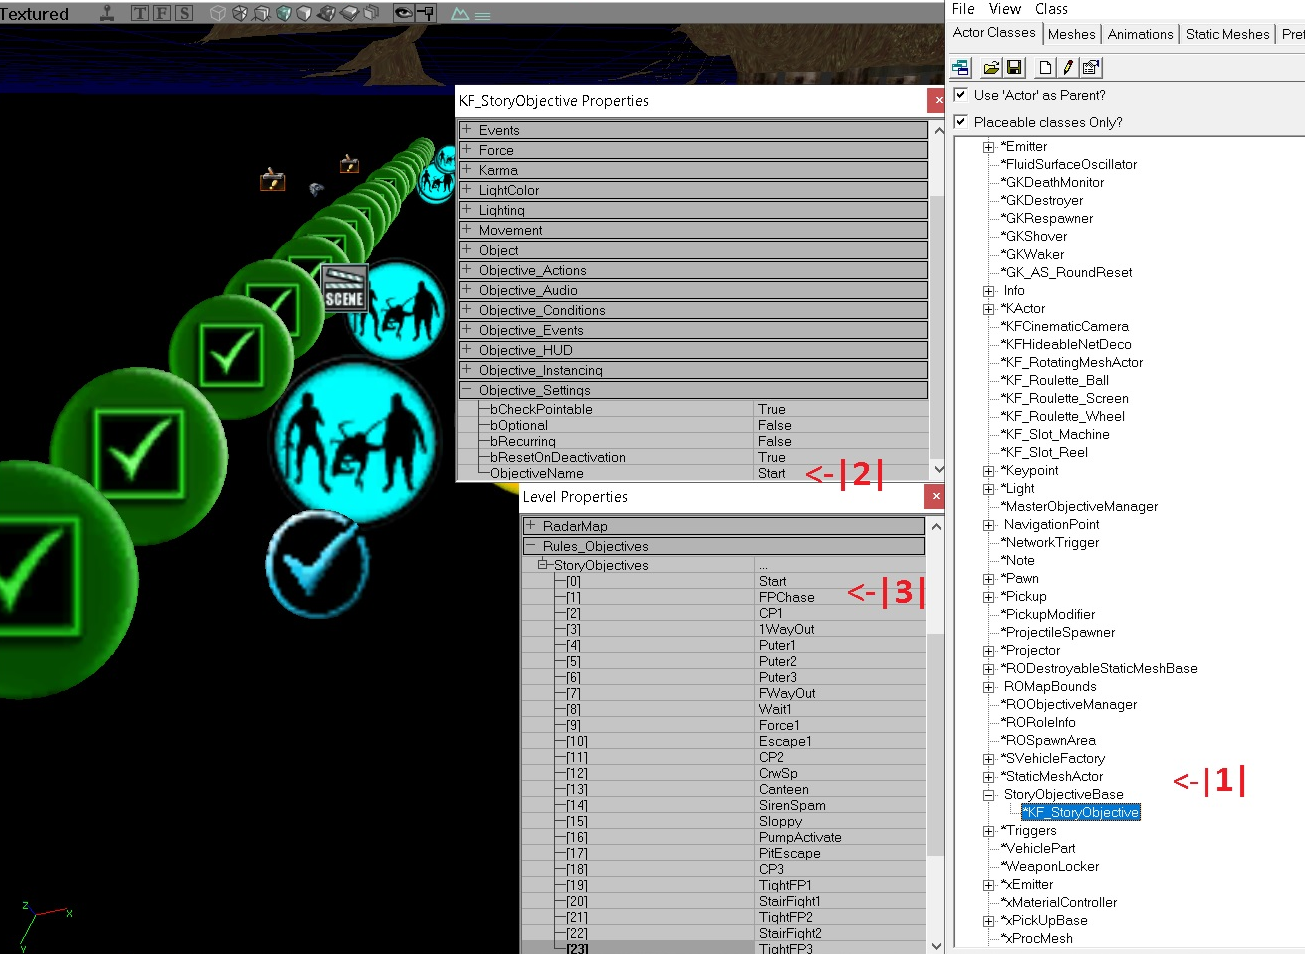
- This is where you can find the objective actor in the actor browser.
- For your objectives to work, they have to be named — the first objective is always named start (unless you’re special).
- Navigate to View → Level Properties or hit
F4to open this window. This is where you tell SDK your expected order of the objectives, by objective name.
That’s the easy part done.
Next, the most significant actor is probably KFLevelRules_Story
Found in: Actor Browser → Info → LevelGameRules → KFSPLevelInfo
^
With this actor you can customise player starting equipment, max zed number (default is 32), starting cash/cash bounty, and the shop (apparently).
As per its name it determines the general rules.
Tip: Objective Mode is a series of triggers and events that you set up yourself, just like story mode, but a wee bit more automated, has a semi-functioning HUD that looks pretty, and a funky agro system. So plan what you want to do, then figure out how to get it to work. Which actor is the cause of an event, when to trigger it, what does the trigger do?
Honourable Mention: Consider making a small KFO project to learn some ropes, then transfer to a KF- story map. It can do the same stuff excusing wave/squad designers. So less automation for zed spawns unless you code a mut of course.
Designing your Objectives
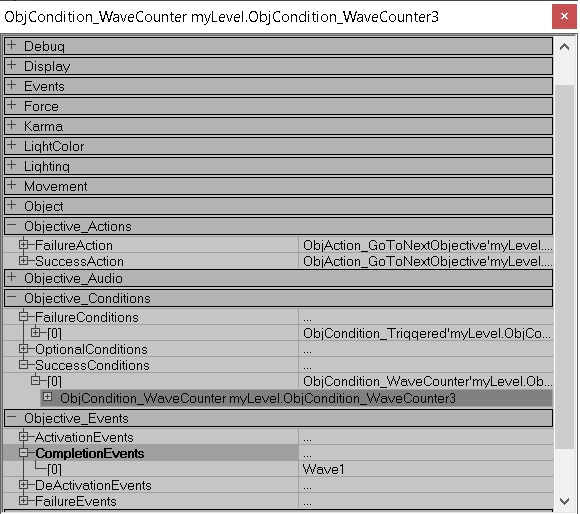
Objective Conditions — Typically whatever the player needs to do or avoid during that objective. But it doesn’t have to be! Remember you can disable HUD & add hidden event triggers or so on. When all the criteria you customise under success conditions are complete (Progress importance: normal), the objective will consider itself won. Likewise, when failure conditions are all met it considers itself lost.
Setting progress importance: critical, on an objective condition makes it so if that critical condition is satisfied at any point, the map moves on to the next objective — regardless of whether the other conditions were satisfied. It’s also worth noting that a team wipe is always a wipe — it’s built in, end of. You don’t need to add it to failure conditions so alternate routes for your objectives are possible.
Objective Actions — Here you customise what happens when you lose or win an objective. The options are:
Objective Events — Here you can customise triggerable events when the objective is activated, completed, deactivated, or failed. This can be linked to explosions, doors, sound effects, zed waves, STs, whatever, you get it yah? Add in the ones you need.
Trigger ObjCondition
Condition is a powerful scripting tool. For coders, it’s like your IfCondition, so you can even get used to adding non-objectives with no HUD and doing whatever you like. Here’s what you need to trigger a condition:

In Game UI (HUD - World Hint)
If your map is anything like a story map, players will get lost. World hints are text, textures or both that can float in the world as an aid. For example, the gold bar indicators in KFO-Steamland. This is what you need to get set up:
IgnoreWorldLocHidden is often missed. Keep hints short. It’s inconsistent on dedi servers so get a test server or use a static mesh mover (much like graffiti) instead.
You will see the hint from everywhere in the map so set up a non-objCondition to activate it based on an event. I recommend ProgressPct event from objCondition area — with rqr full team = false.
Dialogue Actor
Copy-paste from official map. Important notes:
CutScenes
(see endings of official maps or Mansion)
KFSceneManager:
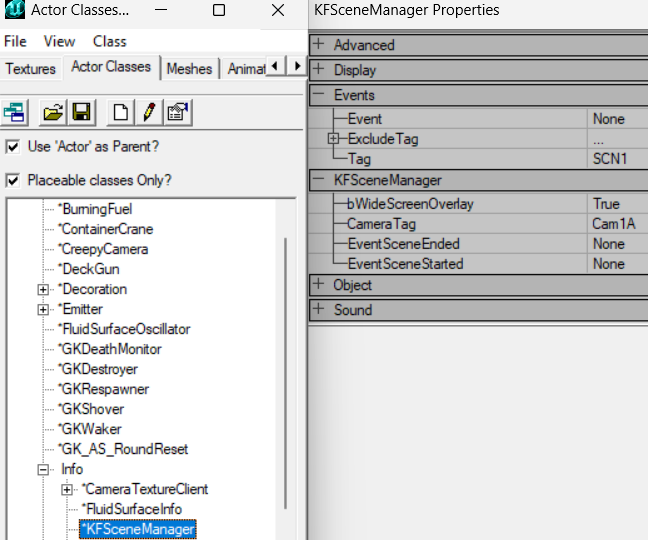
Cinematic Camera:
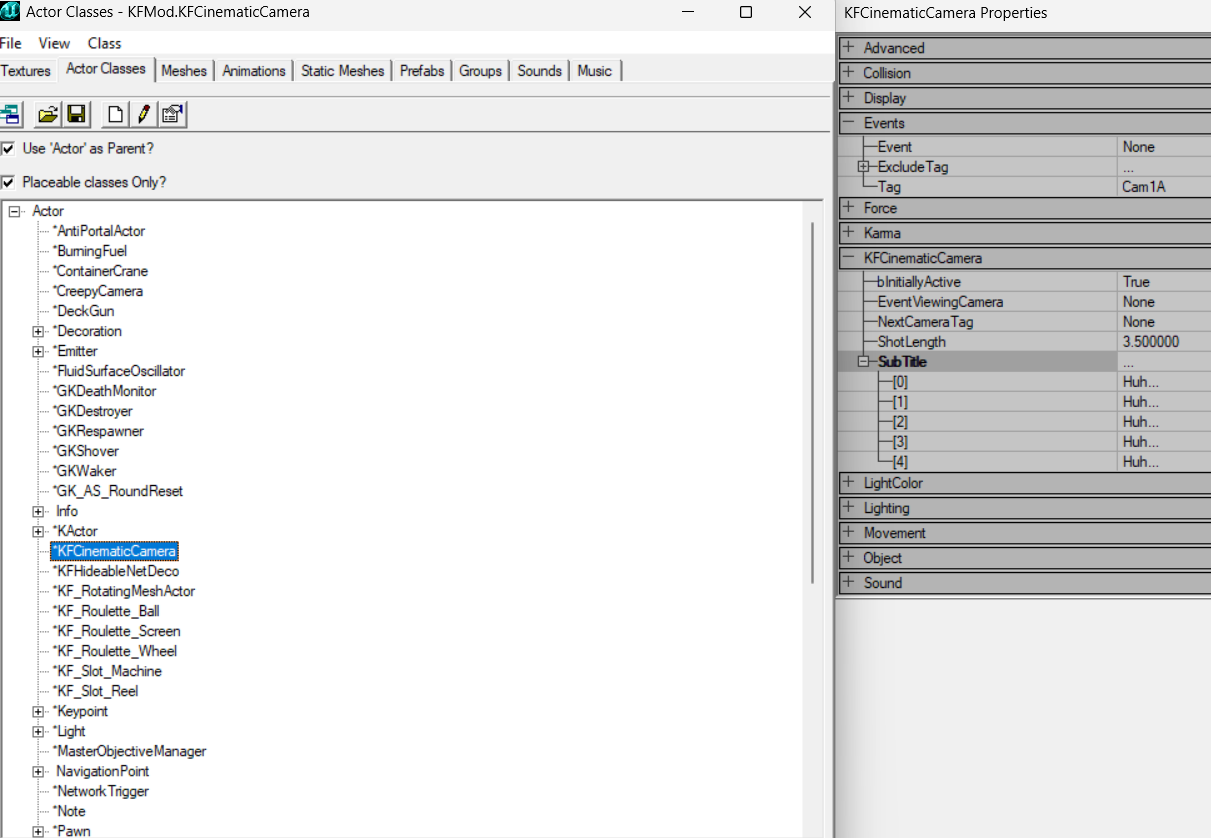
Not covered: Obj can be triggered while not in play, can make objective conditions dependent on objective conditions in KFStoryObj, wave designer + squad designer sets up what zeds spawn from whatever ZedVolumes.
// ProTip: For welder objectives copy-paste KFStoryObj actor from official maps — they do complicated stuff (including unique actors, 2+ conditions per welder box and HUD stuff). Not worth the misery.
// ProTip2: When designing objectives that require a volume, you can use any volume as long as you input its name (under Properties → Object → Name) into the objective condition. So I recommend using the standard Volume. The objective volume has extra code where it spams "Forbidden!!!" in chat if you go inside of it before the objective is activated.
Further Reference
For Wave/Squad Designers (zed spawns) and little KFO tips like a reminder of where to find the actors you need, in actor browser, reference this guide → https://steamcommunity.com/sharedfiles/filedetails/?id=357491760
For tips on other stuff I missed — like Progress Events, which is a part of objective conditions, reference this guide: https://wiki.tripwireinteractive.com/index.php?title=Objective_Mode_(Killing_Floor) OR this guide: https://forums.tripwireinteractive.com/index.php?threads/kfs-containment-story-map-tutorial.80381/
BugsBugsBugs:
- As v briefly mentioned in the TWI wiki above, Wave Designers (for zed spawns) only support 1 wave per actor (V 5 2), they definitely will look like they should work but it'll be like 10-30% of the time so plz, spam wave designers.
- PROBLEMS WITH ZEDS DYING ON SPAWN? This is so annoying but disable (KF_LevelRulesStory or LevelInfo?) -> killStragglers and see if its still there. If not you my lucky friend have an issue related to pathing.
- The KFO HUD such as your objective name and details (top corner), breaks by more or less deleting itself after ~30-60mins time for no reason. You can witness this consistently on the kfo-30waveChallenges. Soo, while you can put hints there maybe not provide info absolutely required for progression into the HUD.
- World hints that you'd use in KFO such as the small "Gold Bar" text in kfo-steamland (as well as being unreliable) also sometimes conflict for god knows why. As such clientside you may see a community kfo world hint replaced by a different official KFO-map's world hint or whatever kfo-map you played last. For example, I constantly see world hints telling me to go pick up a non-existent gold bar (<3 TWI) lol.
🧱 Porting Maps to UE3
UE3 includes a polygon limit when importing maps lol. 65535 of them to be exact. So batches, batches, batches.
And ofc you can check out this TWI forum post.
The process of porting games can vary a lot depending on what game it is and what engine it supports. Preferably games that have a Modding kit supported like an SDK, Hammer, etc.
In short: For Dungeon Defenders, I grab all the assets related to the map I want to work with in DD’s DDDK and move them into a custom new package. Moving assets instead of copying will auto-assign MAT directory references to the new package. Just do NOT save the package changes from the game’s default UPK packages.
Dungeon Defenders is built off an older version of UDK (UE3), so it’s a bit easier to grab similar MATs/Textures/UPKs, but the procedure’s the same. Categorise everything you grab or you’ll lose progress fast.
Since KF2 is built off a newer and heavily modified version of UE3, it’d be nice if we could just grab the packages and load them in, right? Yeah nah. KF2 SDK will crash with a crap ton of errors — UPK structure mismatches, bad mesh renders, particle FX crashes, etc.
The main culprit? Old mesh renders. You’ll need to extract the UPK raw, grab the PSKX, import it into 3DS Max (ActorX plugin), and export it as FBX (2014/2015) — that’s critical for KF2 SDK or it will crash.
Once you’ve packaged everything, build your map slowly. Export selected meshes from DDDK as a .t3d file so they auto-place correctly in KF2 SDK. If it crashes? One of those meshes is bad.
This is why you import a few at a time, not all at once, unless you enjoy watching the SDK implode under memory allocation errors.
After that, rebuild all the usual stuff: Lighting, Pathing, Volumes, etc. Porting isn’t easy.
Alternatively, there’s a slightly more efficient method. For all further advice/tutorials: massive thanks to Steven. Join the KF Modders Discord for support.
📄 WordDoc Tutorial: https://1drv.ms/w/c/27e2d51aa2ebaadd/EdVUVo-W0XZPrTVYohFBNUgBqv3IWB--7woFLt2rDCmICQ?e=apbd7e
▶ YouTube Video:
Notes: (Space for future updates.)
⚙️ Optimisation
Optimisation:
- Lowering the number of polygons / effects displayed at one time in your map.
- Reduce strain on hardware / Increase player fps.
Pre-Optimisation:
Not disregarding theory discussed in ‘Level Design’, one method I’m confident is important for optimisation is keeping the instances of static meshes down (keep copies of SM’s mostly the same scale). Playing with scale is brilliant for reusing assets creatively, but unfortunately, it means more computer calculations, less performance, and probably a bigger file size (I’m not a graphical or software engineer ok? xd)
How to Get This Done
I’m proficient, not an expert, so I’ll leave the specifics up to those that know it all. One way to reduce polygons in a given area is by replacing/converting additive brushes to semisolids, using the special brush builder or via Rick → Type. 👉 Hourences Tutorial on Semisolids
Another way to optimise is to reduce the amount of space a player renders at any given time, which is done with smart level design (consult ‘Level Design’), as well as portals and antiportals.
Portals
Look at any stock KF map in SDK and you’ll see textured sheets cutting through doorways, archways, windows, or room seams, but they won’t appear in-game. Those are portals.
Portals define zones - in this context, areas where a player should always render assets while inside. Anything out of player Line Of Sight (LOS) in another zone can be culled to improve performance.
To create a portal:
- Use the Sheet Builder Tool (beside CubeBuilder) to create a sheet.
- Position it where needed (ideally a perfect fit to windows/doorways).
- Use the Special Brush Tool and select the Portal preset.
Alternatively, go into a planar brush's surface properties and tick the Portal flag, both methods work.
//ProTip: Obviously the dimensions for a perfect fit is hard to work out when UE wont natively provide any selected brush dimensions. Ctrl + MiddleMouse will draw a ruler for you if needed, but I always physically jotted down common dimensions for doors, windows and so on in a notebook, well in advance. I started to look like John Nash when I was in the flow.
AntiPortals
These are another Special Brush preset. Think of them as the opposite of portals. While portals define what’s visible, antiportals define what isn’t. They only cull objects that are completely obscured from view.
So, place antiportals inside terrain, walls, or large SMs. If they block visibility to meshes behind them, those meshes won’t render.
⚠️ Don’t place AntiPortals inside Add BSP / solid space.
Emitters
Particle systems are by far the biggest eaters of performance, use them sparingly. And don't go crazy with the settings.
You can try force attaching their visibility to ZoneX → Object → Name, though it only half-works.
Map KF-Wyre makes it work I think (drove me insane).
Collision
(Thanks to Fel’s guide.) Static meshes with collision — especially nonZeroExtent — eat a surprising amount of performance. If they don’t need it, disable it.
Managing every SM is painful, so be smart with selections:
- “Chandeliers don’t need collision.” → Rick → Select all SM type → Collision off.
- “Blocked-off areas don’t need SMs with collision.” → Select all meshes in zone → Collision off.
CullDistance
Each SM has a Display → CullDistance property.
This defines how far away the mesh should be rendered.
Lower values = less rendering = better performance.
Potato PCs might override this with settings, but that’s not your problem — optimise for the majority.
💡 Remember? Use Shift + Middle Mouse Button to draw a ruler in 2D viewports to measure distance. If it's an awkward use case, just play with Active (Builder) brush dimensions to find out.
CHECK GAME LOG
Sometimes lag is caused by hidden features or scripts, e.g.:
- Inactive KFO conditions with HUD
- Destroy Actor loops
- ST / mover loops
- Karma decorations
Additional / Extreme Measures
- Find all BSP surfaces that players will never see, spawns, roofs, doorways concealed by SM doorways. Apply Engine.Black Texture.
- Display -> LOD Bias (Default Distance LOD scaling override) I use for mass produced / boring static meshes.
Commands:
STAT RENDER— shows an active polygon count currently rendered on screen.
Important Bonus Jank
Having FPS issues?
No matter what I did, I could NOT get it to run better. But you know what fixed it? Cutting all the meshes, saving the map, reopening the editor, and pasting them back in. This somehow doubled my framerate after rebuilding the map.
Before:
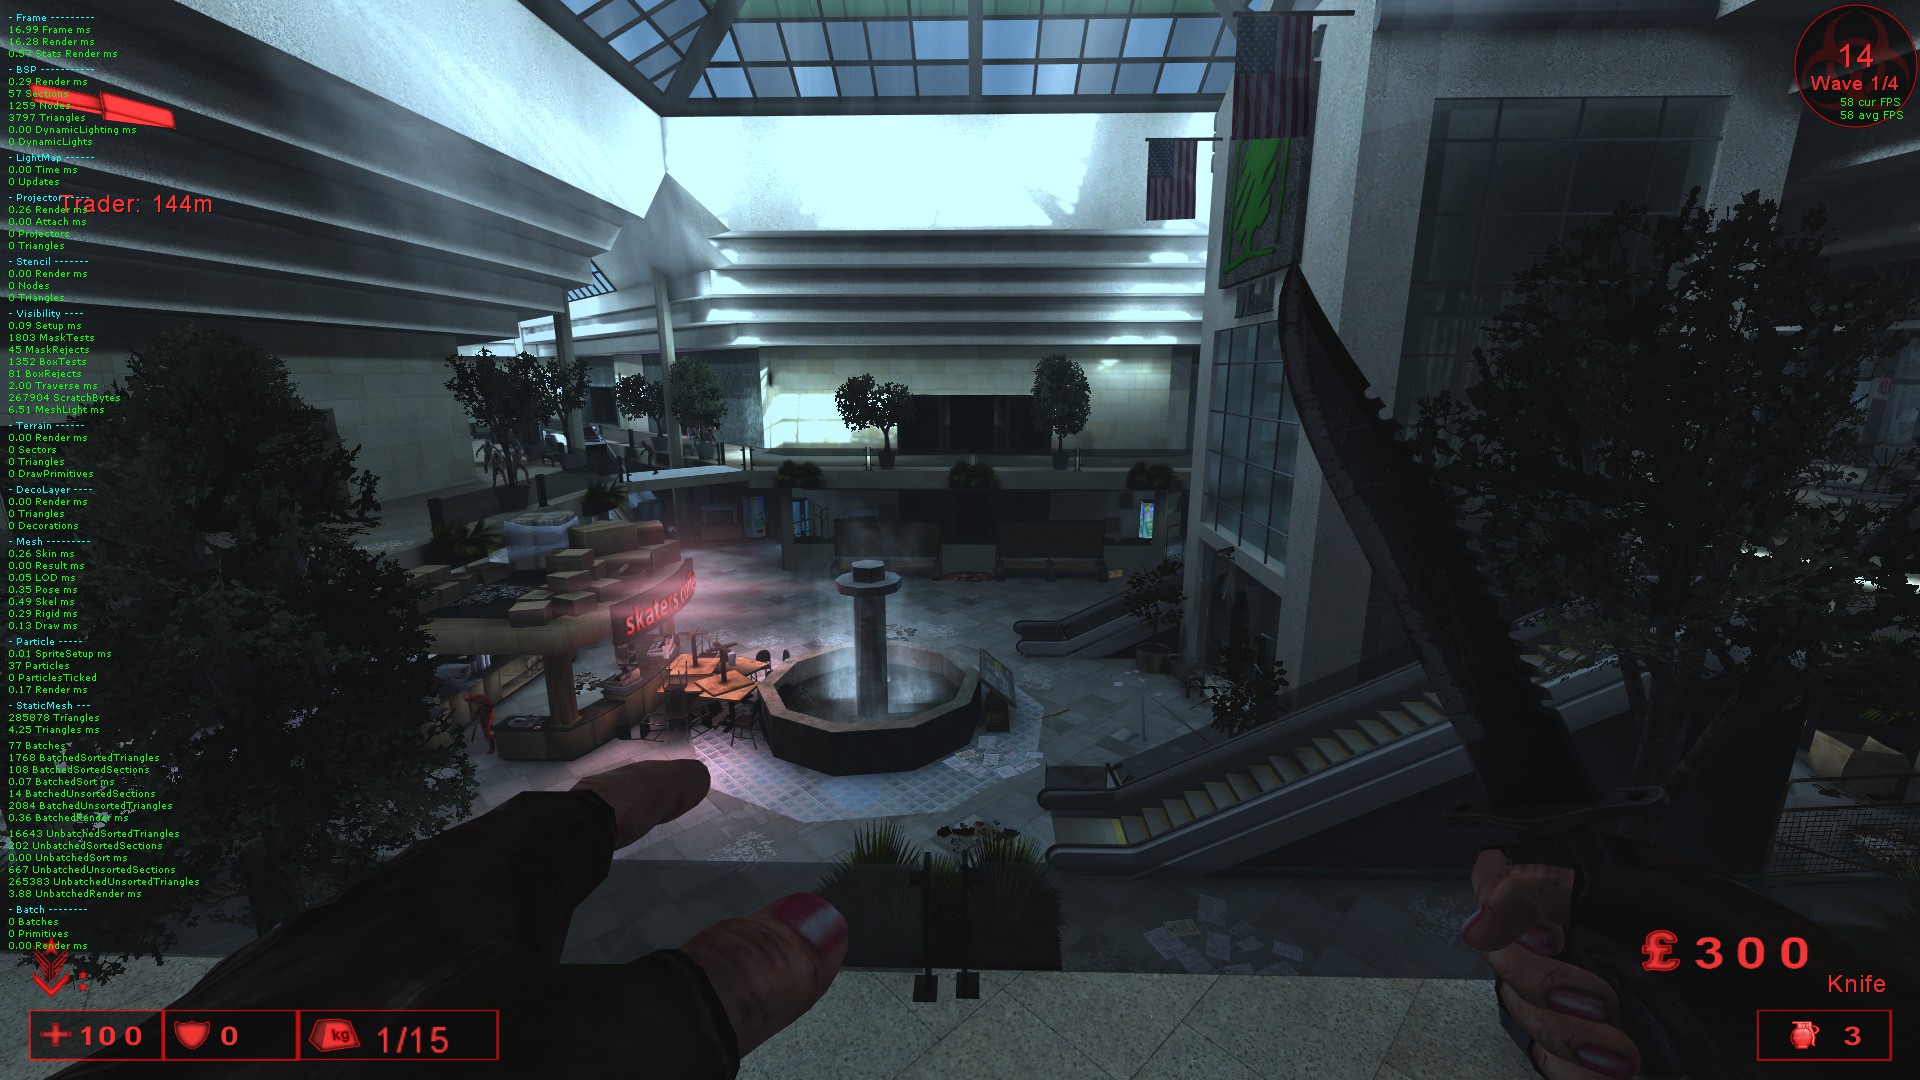
After:
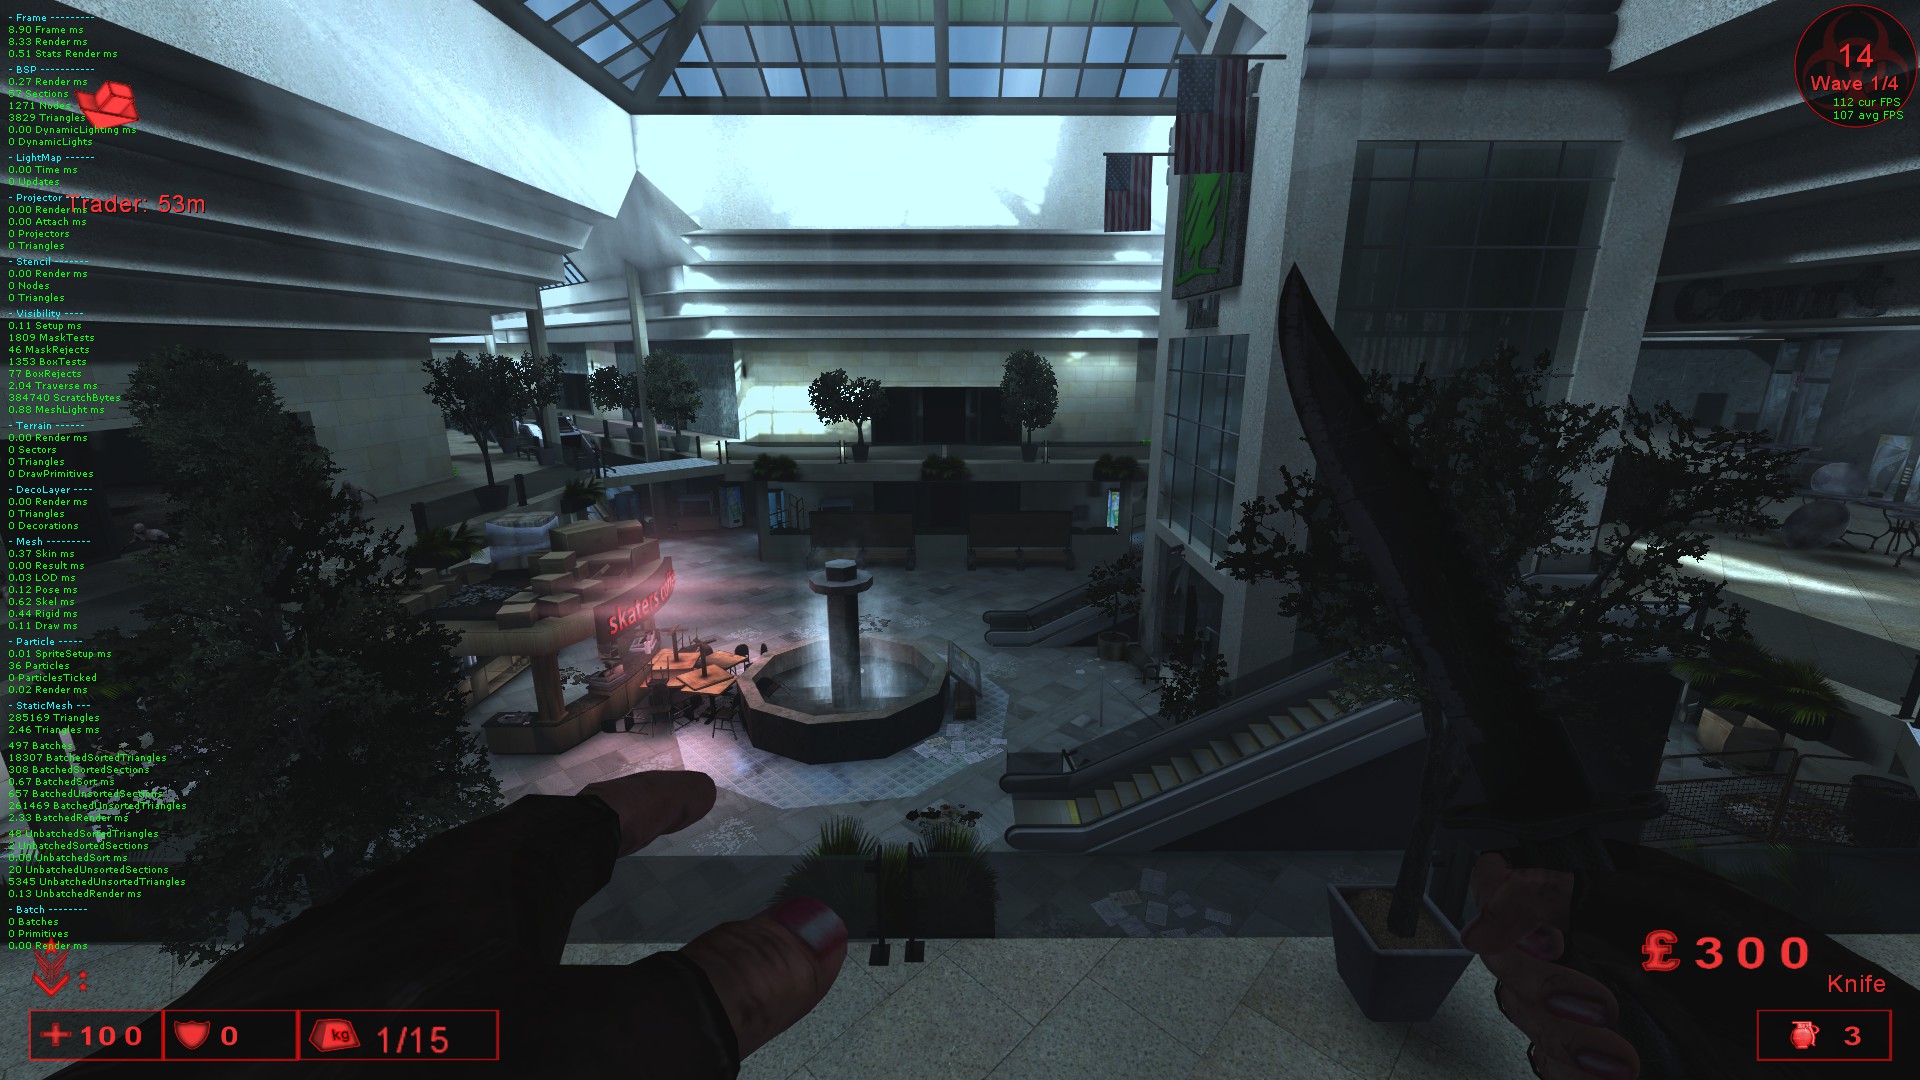
Explainer: According to OldUnreal, this engine’s mesh batching can “break,” forcing it to reload meshes individually per instance. Cut-paste refreshes batching and improves performance.
Extra optimisation reading: 🔗 Tripwire Forum Thread – How to Optimise Your Map
Minor Afterthought: In UE5 terrain, components (heightmap grid parts) duplicate adjacent vertices, adding data and lowering performance. This likely holds true for UE2, larger terrain sectors are more optimised but may worsen collision — a trade-off worth testing. Coincidentally, similar settings exist in kfFluidActors.
^^I tried it, and unless you’re committed and technical... don’t bother xd.
🧪 Testing
Testing is Hella Important. If you release a map you haven’t tested, it’s garbage. 100%.
What’s more, if you don’t have any friends (:c), you’ll probably be relying on solo testing for now and that’s fine. Up at the top of SDK there’s a game controller icon for quick tests, and it’s great for hopping in there on a whim. But for important times, testing directly in a Killing Floor → Solo game is ideal because of two reasons:
- You can easily apply different mutators like fakedplus to check spawn scaling in your map. (Balancing your map is important!)
- You’ll be playing at perk levels that are familiar to you.
Tip: Be a neat-freak and write down notes, change things up too. You’re testing, not playing Biolabs. Swap perks, hold spots, observe. Once you near release versions do bump-tests as well, walk along walls and railings to see where u get stuck. Can you fix it with blocking volumes?
Server Testing 🌐
If testing in-game is 50% better than testing via SDK, then server testing (in private servers ideally) would be 300% better. If you know how to set up a local dedicated server, go for it. Learn how port forwarding works, whatever. If you have friends, nag them and test together! They’ll grow to hate you… Muahahaha.
Anyway, server testing is so brilliant because:
- Some bugs only appear in dedicated servers.
- Assuming your map is successful, 90% of players will play it on a dedicated server anyway.
- It automatically checks for compatibility issues with common mutators in use (rare but possible).
- You’ll experience your map with a team.
- People who test there WILL nag you, issues with collision, spawns, pathing, whatever. It'll all pile up on top of you.
📦 Recommended Resources:
Testing with Bots 🤖
Anything else about how you test is up to you, but for the loners or considerate ones out there, I’d specifically recommend this mutator: https://forums.tripwireinteractive.com/index.php?threads/mutator-kf-bots.44969/
^Extract in Killing Floor → System Folder^
These bots aren't as dumb as official ones so learn how they work, use them, and most importantly have fun!
Relevant Console Commands
Open up the console in game and there're some handy game commands for testing things efficiently, or debugging, in solo or as a server admin. Listed here:
*enablecheats - greylists the game and allows the next few cheats. *loaded - Gives infinite ammo. *god - You won't take damage (same command to disable god mode). *fly - self explantory. *ghost - fly and no clip through everything in game. *walk - Get out of fly or ghost mode. *slomo2 - run the game in 2x (number customisable) speed. *causeevent 123 - Trigger any event of any name (123 in this example).
Custom Commands:
*HugeGnome - collectibles go about 20x bigger *MopUp - killzeds but pastes number of zeds in console. *Arsenal - gives all weapons. *FreeCamera - Doesn't really work for me so might be broken. *ViewSelf - how to UnFreeCamera I would imagine. *Backup - spawn bots. *Horde - spawns random zeds (maybe useful for testing pathing from volumes without waiting for higher wave or before designing waves in KFO).
If you’re struggling to open the console… git gud.
🧱 Tips & Hotkeys (Categorized)
How could a guide named “SDK General Tips” not have a section on tips!
I. Stability & Setup (Essential Fixes and Downloads)
- Save copies often. The software will crash. ↳ The SDK is way more resource-heavy than the game itself, which makes it super demanding on your PC. If you’re getting memory crashes: Lower the graphics in-game to reduce them.
- Log Viewer: View → Log. Keeps track of SDK errors and warnings — super useful for debugging.
- Autosave: SDK keeps 10 files from the last 2 hours in your maps directory, named
auto0→auto9. - Steam's KF SDK permanently jacks gamma up pretty high. Fix = add -nogamma to Steam game properties -> launch options. Alt Fix = Manually open KfEd.exe file.
- Change
KFEd.execompatibility mode for better stability. - Try 800x600 resolution to fix cutoff UI windows. [previewicon=35503155;sizeOriginal,inline;KFEdCompatibility.png][/previewicon]
- 4GB SDK (KFEd) – removes RAM cap. 👉 Download
II. UI Navigation & Workflow (Time-Savers)
- Ctrl + Alt + M1 = Selection box (only in top/front/side views). //ProTip: Try combining with SuperTip3.
- A lot of stuff can only be moved/interacted with while holding Ctrl — try that if you’re stuck.
- Texture Info: Right-click a wall/surface →
Properties→ top of window = texture name + path. - Actor Info:
Properties → Display → Meshshows the name + directory of a selected actor (static mesh). - Apply Skins:
Display → Mesh → Skins → Uselets you apply graffiti or overlays on existing meshes (like grime/glass). - Obvious in retrospect, but for graffiti or reskinned meshes, don’t forget this boolean: [previewimg=35573290;sizeFull,floatLeft;graffitiTip.png][/previewimg]
- Big maps = laggy editor. Use orthographic views (top/side/front) to edit more efficiently. When using the 3D view zoom in to render as little as possible
- Ruler Tool: Shift + MMB. I'm overzealous because I wasted years of my life counting tiny squares. 👉 Extra Tricks Thread
- Shift + D > Copy + Paste. Always.
- Selection Time Savers (be smart): [previewimg=35383871;sizeOriginal,floatLeft;Select.png][/previewimg] [previewimg=35383873;sizeOriginal,floatLeft;InvSelect.png][/previewimg] You can also select all actors of type, all adds/subtracts, all brushes or grouped actors via the Group Browser.
- Reveal All Hidden Actors: Use this tool: [previewicon=35503135;sizeThumb,inline;ShowAllActors.png][/previewicon]
- You can right-click the viewport headbar to customize visibility: [previewimg=35503112;sizeFull,floatLeft;SDK ShowCustomisation.png][/previewimg]
III. Niche Tips / Advanced Fixes (Technical Workarounds)
-
For really tricky BSP holes: Rick-click the problem brush → Type → Convert to Semi-Solid / Non-Solid (+ Blocking Volume). You can also try Build Options → Lower BSP Cuts. threads/static-mesh-import-errors.113852/)
-
Test specifics regularly. Most issues aren’t visible at first glance.
-
Slippery floors: 👉 Forum Tip
-
Be wary of scaling static meshes, it creates duplicates in
myLevel. Discussed in Optimisation. -
KFUseTrigger only works with doors: 👉 Proof Use Trigger, ProxyTrigger or Mover → MoverEvent instead.
-
Launch Pads / Knockback FX: 👉 Forum Guide
-
Custom Lobby Camera Setup for your map: 👉 TWI Forum Tutorial
-
There is a hard limit to actors such as lights/navigation points lmfao. all are capped at ambiguous large values. Compare yourself to big story maps like KF-Hive to stay safe.
-
Tripwire Oversight (Also mentioned in 'Lighting'):
ST’s Broski explains how color correction is borked and how to fix it:
[previewimg=35350377;sizeFull,floatLeft;GuideThing.jpg][/previewimg] Original Post (by Siren Torturer's Broski): "There is code to disable KF's color correction in the standard KFLevelRules, but due to a typo (KFLevelRule.) and an oversight in KFLevelRules code (its missing this boolean entirely) It's not usable. And the color correction options in ZoneInfo does nothing. Same exact code.
Welp, turns out, there is one thing that actually has the code for it still. The story mode actor. And it works. And it has MASSIVE impacts on how maps look. You can more accurately use different themes of lighting.
If you want to see how massive of a difference this makes, drop KFSPLevelnfo () in a default map and set levelInfo->bUseVisionOverlay to false."
IV. Community Advice & Resources
- Unless you have custom texture/mesh packages, always say no to tea (Never save myLevel). [previewimg=35572203;sizeFull,floatLeft;Package.png][/previewimg]
- Asset Naming Conventions (the decent kf creators used back in the day): 👉 Version mismatches & you
- Study official maps. They know what’s stable and well-optimized.
- Maybe look at this for extra SDK functionality (Be v careful unrealed.ini sensitive lol): https://forums.tripwireinteractive.com/index.php?threads/customizing-popup-actor-list.101481/
- Don’t even touch this cursed SDK without good music or a podcast.
- Holy Grail of BSP Basics:
V. Hotkeys (Table Reference)
Key Function Q Toggle BSP W Toggle Static Meshes O Toggle Volumes F Toggle Distance Fog H Toggle Actors B Toggle Builder Brush Ctrl + W Align BSP Textures Ctrl + S Subtract Tool Ctrl + A Add Tool Shift + L Apply texture to all selected surfaces F8 Build Options (always use RGB8 lighting) Extended list: 👉 UE3 Hotkeys
🐞 Known Errors
Things to look out for:
-
Uninstalling KF SDK wipes all of your Killing Floor mutators (and binds). So erm... Don’t Do That xD
-
Selection Delay is a UE2 issue due to modern GPUs, discussed here: https://www.vogons.org/viewtopic.php?f=59&t=90041
-
Selecting surfaces specifically has an even more ridiculously long delay. Zoom in and ensure the Editor is rendering as little as possible in the viewport.
-
Not really an error but KF hates spaces in imports so NEVER add them, especially for sounds (
.uax). -
The config for saving Build settings is borked, and if you do it manually through
UnrealEd.iniit breaks the editor (BIG TIME so don’t ever lmfao). -
Static Mesh Limit: Meshes exceeding 22,000 triangles will warp. 👉 [Static Mesh Import Errors](https://forums.tripwireinteractive.com/index.php?
-
Modern 3DS Max and Blender 2.81+ have never successfully exported a SM into KF1 with multiple UVs/materials for me (I remember hearing it was an issue somewhere too).
-
For broken build/terrain menus try the advice discussed here: https://forums.tripwireinteractive.com/index.php?threads/solution-glitched-terrain-editor-menu.55403/
-
If you use textures or resources from the workshop or modded content, and send the map file for testing without including those resources — testers won’t be able to view the map in game as the title won’t appear at all. If this is causing issues you can ask a friend to open the map file in SDK, and it will give a detailed error report about which resources are missing, so you can narrow down your search.
-
If the map won’t appear in the Killing Floor map list, the most likely reason is because there’s a disallowed character in the map name (such as
"."), or it doesn’t have a KF/KFO prefix. (Another reason might be a dependency, so try convince yourself/them to monitor log real-time as they open the file in SDK.) -
The Undo (
Ctrl+Z) action is restricted, and can cause crashes when reverting projector movements. So be sure to save often if you use it anyway like I do ;D -
Projector textures also tend to multiply their alpha values (by like 1–10%) with every build, eventually becoming completely transparent. Idrk what to do aside stay aware. I literally have to hop in game to see & adjust their position + scale lmfao.
-
Animated decorations work sometimes (even on servers) but also stops some from loading the map at all (crashes SDK too). I think there’s a dependency somewhere that I need to find — although it works in KF-Foundry lol, maybe I’m stupid.
-
Scale map / brush operation crashes SDK (unsurprisingly). Just use vertex editor.
-
The grid alignment often breaks if you consistently use BSP dimensions that aren’t powers of 2 (especially at sizes 1000+), or more often switching between grid 1–2 (often while something in grid 1 is still selected). This means brushes may place themselves in between grid lines, or suddenly gain (non-existent) width in the top/side/front views. If you insist on using grid 1 for meshes (like I did/do a lot), make it a religious habit to always deselect the mesh before switching back to grid 2+.
-
Delay time can’t be properly edited with KFDoorMovers. Fall Trigger Pack’s DoorMoverPlus doesn’t fix this, or maybe I’m just that bad so meh...
-
Ordinary Movers, and routes movers take, can break KF specimen pathing. Whereas KFDoorMovers don’t (in my experience). Prob because path collision is enabled in Properties → Collision by default, so if you insist on using massive movers go ahead and set that to
False. -
There’s a hard limit on the effective number of portals and path navigation points.
-
If you change to a language (like to Russian), RIP. I’ve noticed that it breaks UI Booleans such as True/False functionality feature in properties. Might just be if you download SDK then switch but may even be the same for other languages so gl hf.
-
I heard through the grapevine workshop has a 100 MB upload limit (don’t quote me on this, your map shouldn’t be getting that big and workshop sucks anyway, we all use manual DL links xd).
-
KF SDK can cause you to run out of virtual memory from time to time, so be sure to hit the save button before closing the pop-up. At least use the basic hotkeys to toggle visibility, and reduce your graphics settings. As it does auto-crash the software.
-
Let’s not forget the most important error: why am I publishing a KF SDK guide in 2020? Well... WHY THE HECK NOT! More like I’m disgusted at the lack of them, so who knows. Hopefully at least 1 person finds this useful.
🧰 Workshop Release
It couldn’t be more simple, navigate to Tools → Upload files to Steam Workshop.
Since everyone should have the same Killing Floor file directories, the workshop will only upload files that are inside your Killing Floor folder, and it will install them into other players’ folders exactly where it found yours.
^ For example: if you accidentally put a
.romfile in the Textures folder, the workshop might install it into another player’s Textures folder too. And no one will play your map because you stink.
💡 ProTip: The description box during upload has a strict character limit. But once your item is uploaded, you can freely edit the description on Steam Workshop to format it however you like, bold text, sections, emojis, mid life crisis, it's yours to mutilate as you please.
But first…
Do you Stink?
If you tick every single tag when uploading something simple, you definitely stink. Tags are meant to make the workshop easier to navigate — but for KF, they’re basically pointless now. There’s no moderation for lying tags, so everyone stinks, nobody browses properly, and it sure won’t help your views in the long run.
📖 Reference: Tripwire Wiki – Killing Floor Steam Workshop
Example Map release
Here's a YouTube upload of me releasing a KF map, and the things I might consider beforehand, and post-release:
Template
Don’t underestimate your upload formatting — it’s the main advertisement for your map. If you consider yourself semi-experienced, setting a good standard helps others follow suit (unlike 90% of Steam content creators 😏).
Even if you don’t upload a video, feel free to borrow from this template or the version below (credits to the doofus):
 [h1][b]General Information[/b][/h1]
This remake fixes some nasty original map [b][i]features[/i][/b].
[spoiler]for more info spam comments section[/spoiler]
[list]
[*] Patriarch's spawn in tested, delayed intervals (usually as pairs).
[*] Built-in voteable Hard Mode.
[*] Amounts of dosh given feels more balanced.
[*] There's a second level, with planks, cover and all your wildest dreams.
[*] Additional armour and high tier weapon pickups (with consistent spawn % for all difficulties).
[*] Scripted pipe bombs near blocked off Patty spawns.
[*] Addressed zed pathing issues.
[*] And more fun additions such as a replacement for the siren wave.
[/list]


[h1][b]Whitelist Status[/b][/h1]
[list]
[*] Dedicated server: all clients will level up, get achievs.
[*] Listened server: all clients will level up, get achievs.
[*] Solo: (and you guessed it) Still whitelisted.
[/list]


[h1][b]Technical Information[/b][/h1]
① This is simply a map, no embedded mutators or whatever. To edit/remove pipe bombs search for the tag "PipeSpawner" in the actor class browser and delete or navigate to the scripted triggers -> AI Script.
② 'SkipWave' event command will skip to next trader (but use at own risk on normal mode).
③ The optional Hard Mode features pat spawns without timed intervals, for the classic BossArena experience.
④ Pat spawns are storymap style, so if the probability works out (and you're a lucky bastard) you could have all of the patriarchs spawn in the same room.

[h3][b]Game Mode[/b][/h3]
[code]
Objective
[/code]

[h3][b]Download Link for evil people who refuse to like and subscribe, or admins[/b][/h3]
https://www.dropbox.com/sh/1zuch8rcbo6addy/AACmRci6wVgyAGQbvRzhtVeda?dl=0

[h3][b]Credits[/b][/h3] [/noparse][/noparse][/noparse][/noparse][/noparse][/noparse][/noparse][/noparse][/noparse][/noparse][/noparse]
Pathing, debugging - [url=steamcommunity.com/id/NikC-]FagC[/url]
This formats the page like so: 👉 Example Workshop Page
🙏 Thanks for Reading
Thanks for reading :P
Mucha gratitude if you made it this far. This guide is an ongoing effort and I keep adding to it from time to time, so it never really will be finished :o Whenever I feel I understand a concept better than I did the day before, it’ll expand, and sometimes I’ll try make it look more concise & readable.
It does help me, but I would also hate to think the effort in this guide went mostly to waste given the late release, in a dwindling community. So do feel free to check on it whenever you want and give any support or constructive feedback in the comments section.
So why are you still here? Weirdo. Well, I may as well give one more link.. here’s a video of a KF Speedmapper?, in a timelapse:
See if you can spot some of the features you may have learned along the way, how you could plan, or maybe upscale some of his building methods. It’s an amazing example for planning, although nobody cares if it’s scribbles. With a ruler and more effort, you can accurately envision a plan with usable dimensions.
Anyway, maybe I’ll catch you around town :o
Keyword Glossary
Active brush – The red brush frame used for creating new BSP or volumes (actually called builder brush apparently).
Brush – The building blocks (blueprint) of all BSP in your map.
BSP – Binary Space Partitioning, it either cuts out space for your player or Adds → smacking cubes together to design levels.
Icon – The smaller buttons at the bottom and top of the viewports.
Keyframe - A position or rotation set on a Mover to define a step in its movement path (e.g., Key 0, Key 1). LOS – Line Of Sight.
Navigation Point – Something that acts as, or is a path node for zeds + bots.
Proscribed Paths – Disallowing a route from a given navigation point (A) to the specified one (B).
Rick – An immature joke replacement, for a right click.
SM – Shorthand for static meshes.
ST’s – Shorthand for Scripted Triggers (or sometimes the Siren Torturers community). .T3D - A text-based file format used to export and import geometric data and actors between map editors.
Tool – All the big icons on the left side of the SDK, which can change the function of your mouse clicks, or the shape and function of your active brush.
UE – Acronym for Unreal Editor, or Unreal Engine, duh. .UPK - The proprietary package file used by the Unreal Engine to hold all game assets (meshes, textures, sounds, etc.). Only relevant for porting to UE3. Viewport – The windows that you’ll see your map through (including Top, Front, Side and 3D).
ZVol – ZombieVolume Actor for specimen spawns.
📚 References + Updates (Categorized)
I. Official Documentation & Core Engine Info
Link Subject Notes https://docs.unrealengine.com/udk/Two/SiteMap.html UE2 Site Map Good rounded reference for UE2 engines; some inaccuracies but still worth bookmarking. http://wiki.tripwireinteractive.com/index.php/Console_Commands_(Killing_Floor) Console Commands Commands for debugging and testing in-game. https://wiki.tripwireinteractive.com/index.php?title=Killing_Floor_(modding) TWI Modding Wiki TWI wiki with mostly unbroken links; good for mapping & modding, including ways to edit stuff without touching code. https://docs.unrealengine.com/udk/Two/CreatingTerrain.html Terrain Creation Crucial link used in the Terrain section for basic setup and creation. https://docs.unrealengine.com/udk/Two/EditingTerrainMaps.html Terrain Moulding Crucial link used in the Terrain section for sculpting and brush tools. https://docs.unrealengine.com/udk/Two/EditingTerrainLayers.html Terrain Layers Crucial link used in the Terrain section for texture blending.
II. Mapping Guides & Advanced Techniques
Link Subject Notes https://www.moddb.com/games/unreal-tournament-2004/tutorials/unreal-mapping-quick-start-guide-ut2004 UT2004 Basics Basics not covered in this guide (BSP fundamentals, etc.). https://www.kf-wiki.com/wiki/Help:Mapping_Crystal_Lake Official Map Case Study Detailed case study on designing a map using an official one as the base. https://forums.tripwireinteractive.com/index.php?threads/kfs-containment-story-map-tutorial.80381/ Objective Mode (KFO) Guide Guide specific to setting up Objective mode. https://forums.tripwireinteractive.com/index.php?threads/how-to-optimize-your-map.43175/ Optimisation Optimising your Killing Floor Map + other references in the thread. https://wiki.beyondunreal.com/Legacy:XWeatherEffect Advanced Weather Reference for complex weather effects (e.g., snow, rain). https://forums.tripwireinteractive.com/index.php?threads/level-design-assets-and-tutorials-reference-thread.53850/ Assets & Resources Great post with tutorial links & free providers for textures, sounds, and models. Includes SFX resources.
III. Specific Actor & Component Guides
Link Subject Notes https://lodev.org/unrealed/movers/movers.html Movers Detailed info on movers; noted that "making a lift" may not apply to this editor. https://docs.unrealengine.com/udk/Two/MoversTutorial.html Movers Tutorial Crucial link used in the Movers section for detailed settings. https://docs.unrealengine.com/udk/Three/UsingWaypoints.html#Using%20Waypoints Pathing Tutorial and info for navigation points and pathing. https://forums.tripwireinteractive.com/index.php?threads/setting-up-the-lobby-camera.110362/#post-2019092 Lobby Camera Crucial link used in the Tips section for custom camera setup. http://www.hourences.com/tutorials-semi-solids/ Semi-Solids Crucial link used in the Optimisation section for an alternative to additive BSP. https://forums.tripwireinteractive.com/index.php?threads/how-do-you-make-slippery-floor-in-kf.56290/ Slippery Floors Crucial link used in the Tips section for material properties.
IV. Video Tutorials & Community Resources
Link Subject Notes https://youtube.com/playlist?list=PLCCE44FF88A6409C1 KF SDK Vids (Lethal Vortex) Probably the only guy who made more than 2 SDK vids just for KF1. https://youtu.be/X6mi5Yh6vmk UE2 Tutorial Vids (General) This guy made $\sim$100 UE2 tutorial vids, and 95% still hold up for this editor version. https://www.youtube.com/watch?v=XLspWWx3Qos&feature=youtu.be KF Speedmap Timelapse Video of a KF Speedmapper in a timelapse. https://www.insultplayers.ru/killingfloor/beyondunrealwiki/(start).html Monster Reference Rehosted Monster Reference for UT2004/KF editors. https://beyondunrealwiki.github.io/ BeyondUnreal Wiki Alternative rehost for the same material. https://github.com/InsultingPros Community Tools & Assets Contains links to KF story map archive, other stuffs, and redirect tool. https://www.rosswilding.com/design-resources Level Design Research For further research (mostly Level Design theory).
🕓 Update History
02/21
- Added Terrain section.
07/23
- Added Tip No.16 + Super Tip No.2 + small addition to Objective Mode.
01/24
- KFMusicTrigger (final note to Triggers section).
- Copied a cool tip (SDK-4gb) to Intro as often missed.
03/24
- The BSP Hole section of Build and BSP was REALLY outdated — don’t base your knowledge in that regard off my old vision, I’ve updated a lot of it. Oof sorry ><
- Created a guide section Spawn Points that quickly summarises zombie volumes.
- Added an important visual reminder to Vertex Editing.
- Beefed up SuperTips thanks to [ST]Broski’s spots. It’s really cool now, check it out!
- New Honourable mentions in BSP and Lighting.
- Re-uploaded some images that used to only be accessible through Imgur links (most noticeable in Objective + Basics on Browsers section). Still ugly but blame cruddy ol’ Steam formatting — wasn’t aware they updated it.
- Shoved a template in Workshop Release for help with formatting map releases.
- Added Tip No. 5+6+18, Texture Browser ProTip, and cleaned up Errors.
- Edited Level Design.
- Added link to Known Errors for debugging corrupt terrain/build menu.
04/24
- Updated Objective Mode.
- Added “Hiccup” to SkyZoneInfo.
- Rewritten BSP Hole section again lol (nothing new to declare — was just sick of the EditNotes).
- Got TriggeredCondition actor working for me on some new projects so added it to Scripted Triggers section.
05/24
- Big addition for Porting Maps to UE3, including vid.
- Reduced size of Steam’s floating TOC by combining Tips + SuperTips and these sections.
10/24
- Updated paragraphs 1–2 of Level Design.
- Attached a Steam discussion about Unreal unit scale to Build & BSP.
12/24
- Updated Deep Dive – Assets following some 3ds Max jank I played with today.
01/25
- Added SDK Reference thread & a tutorial link for Weather Effects to References (it may appear cropped in browser, so feel free to copy-paste text into Notepad if that’s easier).
07/25
- Added Important Bonus Jank to Optimisation (Double Framerate. Credits to jk).
- Added ProTip3 to Level Design (Ammo % pickup work-around. Credits to braindawg).
09/25
- Attached jk’s guide to Intro as it discusses ST’s RAM-enabling edit for KFEd.exe.
BIG CREDITS: Especially in recent years, Siren Torturers Discord has contributed tons of snippets for this guide — give them thanks if you bump into them (Discord link in intro if you’re curious).
-